Lining - Ply And Carpet Questions.

Skyliner33

Senior Member
VCDS User
VIP Member
T6 Legend
Ok I am now up to the stage of buying the ply panels and carpet.

Ply Panels
Options
Floor: 12mm or 9mm.
12mm maybe a bit more solid, disadvantage more weight
9mm maybe a bit flexible, advantage lighter weight
With both will need to think about height and matching the steps.

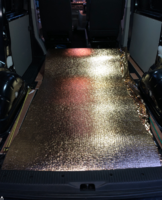
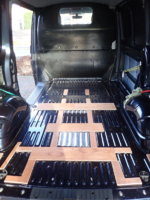
At the moment I have 9mm batons (Silent Coat between) and then some 5mm spongy insulation stuff then they ply floor to go on this.

Sides:
6mm or 3.6mm
Custom shop designs suggested 3.6mm was fine unless I planned to put any speakers in then go for 6mm. Is this the way to go? Or can I get away with 3.6mm and mount speakers (not going to at the moment but what if in the future?)

Carpet:
I have read on hear about jointless (1 piece carpet), especially on the awessome work by @Absolut5 but Harrisons said with 2 m width carpet its not possible to line the back of a SWB panel van only using 1 piece. Is this correct?
If not where would the carpet start?

Secondly, if I wanted to do 1 colour carpet how many meters would I need.
Or if I wanted 2 colours 1 for the metalwork and a second for the removable panels how much would I need.

Thanks for any info you can give to help these decisions.
 
I would go for 3.6 mm panels as the hidden clips work best with that .
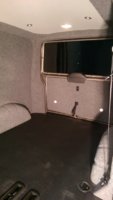
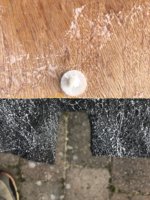
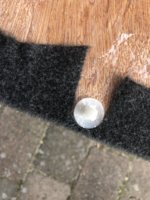
I did my metal work and put joints in you can't see them and imo it was easier and less waste .

IMAG2290.jpg

IMAG2291.jpg
 
Thanks, that looks great. I would be well happy with a finish like that. How much carpet did you use and where are the joints?
I got the kit from Harrison's trim supplies .
There aren't lots of joints ,there is one each side of the tail gate near the top coroner . It is quite easy to get an invisible joint
 
Ok I am now up to the stage of buying the ply panels and carpet.

Ply Panels
Options
Floor: 12mm or 9mm.
12mm maybe a bit more solid, disadvantage more weight
9mm maybe a bit flexible, advantage lighter weight
With both will need to think about height and matching the steps.

At the moment I have 9mm batons (Silent Coat between) and then some 5mm spongy insulation stuff then they ply floor to go on this.

Sides:
6mm or 3.6mm
Custom shop designs suggested 3.6mm was fine unless I planned to put any speakers in then go for 6mm. Is this the way to go? Or can I get away with 3.6mm and mount speakers (not going to at the moment but what if in the future?)

Carpet:
I have read on hear about jointless (1 piece carpet), especially on the awessome work by @Absolut5 but Harrisons said with 2 m width carpet its not possible to line the back of a SWB panel van only using 1 piece. Is this correct?
If not where would the carpet start?

Secondly, if I wanted to do 1 colour carpet how many meters would I need.
Or if I wanted 2 colours 1 for the metalwork and a second for the removable panels how much would I need.

Thanks for any info you can give to help these decisions.


The floor thickness with your 5mm sponge u dear it will depend on what you going trim it in, Altro stick with 12mm, hard wearing rubber backed carpet 9mm.

If you are fitting furniture then 12mm is best

We manufacture our panels with a width of 6mm with complete hidden fixings and sound very solid and dense, but 3.6mm will allow speakers to be fitted as you can always mount a collar behind to strengthen them and allow

Start the lining from the top of the B pillar

Look at megavanmats they do carpet kits
 
Thanks for this:

The floor thickness with your 5mm sponge u dear it will depend on what you going trim it in, Altro stick with 12mm, hard wearing rubber backed carpet 9mm.

If you are fitting furniture then 12mm is best

I was thinking Altro, and maybe furniture.

We manufacture our panels with a width of 6mm with complete hidden fixings and sound very solid and dense, but 3.6mm will allow speakers to be fitted as you can always mount a collar behind to strengthen them and allow

Thats good to know.

Start the lining from the top of the B pillar

I think I get it now, start with the 2m end of the roll vertical at the off side B pillar. Then work towards the back of the van, across the top of the tailgate, and forwards along the near side. That would use a lot of extra material, especially if you trim all the ply in a contrasting colour.

Look at megavanmats they do carpet kits

These are all I can find: https://www.megavanmats.online/online-shop
 
I run a company that provides cnc router panels for a lot of van liners and wheel chair access (WAV) modification company’s. All use a 12mm floor and 5.5mm sides and roof ( if doing the roof in a single piece) and use packers in between the “ribs” in the floor pan
 
I run a company that provides cnc router panels for a lot of van liners and wheel chair access (WAV) modification company’s. All use a 12mm floor and 5.5mm sides and roof ( if doing the roof in a single piece) and use packers in between the “ribs” in the floor pan

Thanks. What do you mean by packers in between the "ribs" please.

This is the 5mm floor insulation I bought:
Screen Shot 2019-01-14 at 16.46.03.png
( Premium Gold underfloor insulation )

I got an email of a conversion company who said they just screw the 12mm ply to 9mm batons I have down already.
So is it a case of just throwing this stuff away and doing without. Im not sure I like the idea of no insulation at all under the floor. Are there any alternatives?
Thanks
 
Thanks. What do you mean by packers in between the "ribs" please.

This is the 5mm floor insulation I bought:
View attachment 35287
( Premium Gold underfloor insulation )

I got an email of a conversion company who said they just screw the 12mm ply to 9mm batons I have down already.
So is it a case of just throwing this stuff away and doing without. Im not sure I like the idea of no insulation at all under the floor. Are there any alternatives?
Thanks
Keep the insulation you have down and place 9mm plywood in the gaps where the floor is raised, then screw the 12mm down. That stops the floor from bowing when you walk in it
 
Keep the insulation you have down and place 9mm plywood in the gaps where the floor is raised, then screw the 12mm down. That stops the floor from bowing when you walk in it
Thanks, however I've already stuck the 9mm batons down. :/

47_bulkhead_out.JPG

40__Battons_slientcoat.JPG
 
Fair enough,the only issue you might have is if you get any condensation trapped between the insulation and the floor of the van,the plywood could delaminate
 
Fair enough,the only issue you might have is if you get any condensation trapped between the insulation and the floor of the van,the plywood could delaminate
So I'm better off just with more silent coat between the batons and then the 12mm floor? What about a vapour barrier?
 
On the 4 vans I have done over the years, I put silent coat down then bind the battens to the silent coat. I also yet to half lap the 12mm floor joints as to stop sagging in the floor or as in my last van I routered the floor out of a single sheet of 10 x 5 plywood before screwing to the van floor. I the use to get under the van to seal where the screw came through the floor. Perks of running a CNC plywood company I now have a Caravelle as I was spending to much time converting vans
 
On the 4 vans I have done over the years, I put silent coat down then bind the battens to the silent coat. I also yet to half lap the 12mm floor joints as to stop sagging in the floor or as in my last van I routered the floor out of a single sheet of 10 x 5 plywood before screwing to the van floor. I the use to get under the van to seal where the screw came through the floor. Perks of running a CNC plywood company I now have a Caravelle as I was spending to much time converting vans
Have you got a website fella?
 
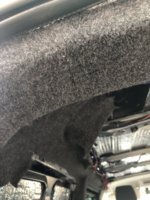
We done our first van in one piece having never done it defore. We started from the ‘B’ pillar having removed the trim. We found that if you cut out leaving plenty of excess you can tidy it up once you are happy with the finish making sure there are no wrinkles
 
I'm just about to start, but need to work out how to make the joins as invisible as possible first. As its my first go I think a 1 piece install with no joins is a bit ambitious.
I did mine with a join, if you’re going to do the same leave the top of the tailgate until last. Joining it is easy, just lay the piece you are joining over the top then using a new blade cut through both pieces at once. Peel away the scrap material add a bit more glue then butt them together.
2C3D3C03-80D5-406B-9BFB-EDD1867609BB.jpeg
A few more tips......
4EC42AA5-6056-4B9A-80E1-7D091492BE82.jpeg
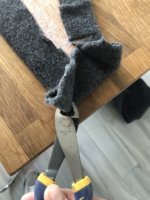
Use side cutters to trim off the “pigs ears” and you get nice flat joins on the back of your panels
DE77249A-562D-4DE4-8DF5-897ECC62B33F.jpeg
Make U shaped cuts before wrapping the edges of panels then use something flat and smooth to tuck the carpet under the hidden fixings this will make it much easier to get them in the holes when fitting them in the van.112BF664-8499-48DC-9548-D06C3DC642DA.jpeg


71BBBF72-3BD7-4113-A9F5-0DAD347A4490.jpeg


412F7825-65FC-404F-9C96-5C43FEC7962F.jpeg

Lastly before cutting away the excess material. Offer up one of your old side panels and draw round it with dress makers chalk or mark with masking tape, then you have a guideline to cut to. It’s easy to lose which part of the carpet is “seen” and which is hidden behind the panel.

DC2ED2D7-80AB-46B4-AF77-4F94784B40DF.jpeg

7D0364FE-AAC6-403D-9A5F-FDB776F952BC.jpeg

B3D0C87F-2FCA-4FB7-86F6-779ACC20C4B7.jpeg
 
Thanks. Good tips. I've done all the panels first. Did them the way you suggested. Cheers
 
Thanks. Good tips. I've done all the panels first. Did them the way you suggested. Cheers
Also make sure you have plenty of new blades the carpet blunts them quickly and something to kneel on. My knees were battered and I was using knee pads. I’d use cushions next time! Another top tip......lighter fuel (the stuff that goes in a zippo) gets the glue off, and in my opinion the smell doesn’t last as long as white spirits.
 
Back
Top