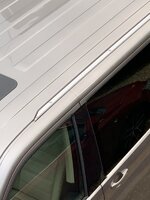
Leak free awning rail fitting (I hope)

moodsterT6

T6 Caravelle - Day Van - Occasional Camper
T6 Pro
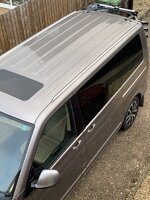
Fitting awning rails to both sides of the van and wasn’t confident about water tightness. Then found all the horror stories about leaks through the roof rail fittings into the interior of the van. I found this thread which is really helpful:


I don’t intend fitting roof bars / rails though, just awning channel on both sides.

So I removed the rails and discovered I’d crushed the washers supplied with the rail as I think I over tightened them. the silicone sealant did appear to have sealed nicely around the bolts and may have been water tight as they were. But water getting into the van which is a 2019 Caravelle kept me up all night.

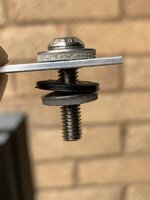
This is the solution I used to fit both the rails. I used EDPM roof washers, some stainless steel M6 bolts and some ordinary rubber tap washers (Proper ones)

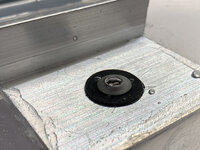
I tested first using a scrap piece of aluminium the same depth as the awning rail with the bolt / washer combination for 24 hours using an ice cream container filled with water.
1E08DCD9-5DEC-4F69-9A81-7FEFC9A9C0EA.jpeg60E92A1B-8DB4-4086-8A01-F34CC5614554.jpeg
F366F990-D0E7-459C-BD96-8BF5FD1D25E5.jpeg

Completely leak free after 24 hours and no sealant was used.

I also tested how much torque was needed to compress the EDPM washers sufficiently to create a seal without crushing them too much. 4 Newton Meters was the sweet spot I found.

7746296B-7EBC-4AD2-99C1-A8B9420EFD61.jpeg4EE428AB-00F8-4D27-B804-8DAB8E7D7658.jpegE5D562BF-4CC4-45BD-BE3C-524D69D4ADBB.jpeg

34B45AA6-2E17-4AA1-ACE8-EACAE9207477.jpegEFE69E59-C5FB-43CA-9999-90067C71BBE5.jpeg

I used some plastic wedges to keep the rail lifted a bit whilst I lined up the bolts into the holes in the roof. I did still use a little silicone sealant in the bolt holes just as an extra line of defence.

If I was fitting roof rails I would use the method https://www.t6forum.com/threads/roof-rail-leak-free-fixing.6121/ but as I only need awning rails I chose to use bolts for a neater finish.

Using the washer combination also raises the awning rails a few mm’s off the roof. I wanted this to ensure water can drain fRon the roof gutter properly without being trapped in a slight gap between the rail and the roof.

hope this helps someone.
 
Last edited:
Fitting awning rails to both sides of the van and wasn’t confident about water tightness. Then found all the horror stories about leaks through the roof rail fittings into the interior of the van. I found this thread which is really helpful:


I don’t intend fitting roof bars / rails though, just awning channel on both sides.

So I removed the rails and discovered I’d crushed the washers supplied with the rail as I think I over tightened them. the silicone sealant did appear to have sealed nicely around the bolts and may have been water tight as they were. But water getting into the van which is a 2019 Caravelle kept me up all night.

This is the solution I used to fit both the rails. I used EDPM roof washers, some stainless steel M6 bolts and some ordinary rubber tap washers (Proper ones)

I tested first using a scrap piece of aluminium the same depth as the awning rail with the bolt / washer combination for 24 hours using an ice cream container filled with water.
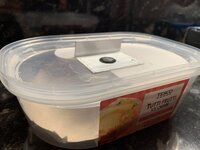
View attachment 105245View attachment 105246
Completely leak free after 24 hours and no sealant was used.

I also tested how much torque was needed to compress the EDPM washers sufficiently to create a seal without crushing them too much. 4 Newton Meters was the sweet spot I found.
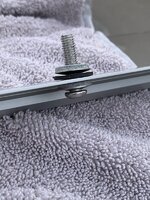
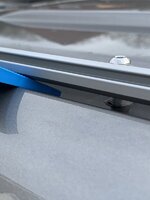
View attachment 105247View attachment 105248View attachment 105249

I used some plastic wedges to keep the rail lifted a bit whilst I lined up the bolts into the holes in the roof. I did still use a little silicone sealant in the bolt holes just as an extra line of defence.

If I was fitting roof rails I would use the method https://www.t6forum.com/threads/roof-rail-leak-free-fixing.6121/ but as I only need awning rails I chose to use bolts for a heater finish.

hope this helps someone.

Hi, great advice, write up and pictures, exactly what this forum is about. Thank you for taking the time to share your experience. Can I ask what awning rail that is and where you purchased it.
 
Hi, great advice, write up and pictures, exactly what this forum is about. Thank you for taking the time to share your experience. Can I ask what awning rail that is and where you purchased it.

Hi, I purchased one for each side of the van from VW T5 T6 Bolt On Awning Rail – Camper Essentials

The rails were supplied with washers / bolts and fitting instructions, I just preferred my fixing method.

Really happy with the rails though.
 
As a paid up member of the DIY Mechanical Moron Society, I'm full of admiration for anybody attempting even a minor(ish) job like that or, indeed, any other requiring the courage to make holes in the van. Well done.
 
As a paid up member of the DIY Mechanical Moron Society, I'm full of admiration for anybody attempting even a minor(ish) job like that or, indeed, any other requiring the courage to make holes in the van. Well done.
The holes are already in the van. The difficult bit is making sure there are no leaks. :thumbsup:
 
The holes are already in the van. The difficult bit is making sure there are no leaks. :thumbsup:
Surely VW could have come up with a better design than having holes in the roof which go right through to the interior.
 
  • Like
Reactions: DXX
Fitting awning rails to both sides of the van and wasn’t confident about water tightness. Then found all the horror stories about leaks through the roof rail fittings into the interior of the van. I found this thread which is really helpful:


I don’t intend fitting roof bars / rails though, just awning channel on both sides.

So I removed the rails and discovered I’d crushed the washers supplied with the rail as I think I over tightened them. the silicone sealant did appear to have sealed nicely around the bolts and may have been water tight as they were. But water getting into the van which is a 2019 Caravelle kept me up all night.

This is the solution I used to fit both the rails. I used EDPM roof washers, some stainless steel M6 bolts and some ordinary rubber tap washers (Proper ones)

I tested first using a scrap piece of aluminium the same depth as the awning rail with the bolt / washer combination for 24 hours using an ice cream container filled with water.

View attachment 105245View attachment 105246
Completely leak free after 24 hours and no sealant was used.

I also tested how much torque was needed to compress the EDPM washers sufficiently to create a seal without crushing them too much. 4 Newton Meters was the sweet spot I found.
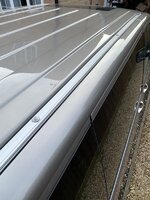
View attachment 105247View attachment 105248View attachment 105249

I used some plastic wedges to keep the rail lifted a bit whilst I lined up the bolts into the holes in the roof. I did still use a little silicone sealant in the bolt holes just as an extra line of defence.

If I was fitting roof rails I would use the method https://www.t6forum.com/threads/roof-rail-leak-free-fixing.6121/ but as I only need awning rails I chose to use bolts for a neater finish.

Using the washer combination also raises the awning rails a few mm’s off the roof. I wanted this to ensure water can drain fRon the roof gutter properly without being trapped in a slight gap between the rail and the roof.

hope this helps someone.
Great work and really clear. Thanks for the share.
 
Surely VW could have come up with a better design than having holes in the roof which go right through to the interior.
You would think so wouldn't you. You can put roof rails on cars and not have leaks, I dont see why they dont use the same method. o_O
 
As a paid up member of the DIY Mechanical Moron Society, I'm full of admiration for anybody attempting even a minor(ish) job like that or, indeed, any other requiring the courage to make holes in the van. Well done.
I am with you... I drilled some holes in the kitchen unit and checked 5 times before I did it .... there are some people on here who are so skilled ... i will stick to being nice to everyone and joing your clubif I may @Ayjay ?!?!?!
 
We used a little silicone on the thread works great.... belt and braces...:thumbsup:.....nice job

When I removed the awning rails after the first attempt I was pleasantly surprised to see how well the silicone had set around the threads. It actually narrowed the holes in the roof to the point the silicone had its own thread

I don’t think it would have leaked to be honest despite me crushing the washers. I wanted to raise the rails off the roof a few mm’s and the EDPM washer / rubber washer combination worked well.
 
PTFE TAPE on the bolts threads , iv used this on other applications boats , bikes and holds out quite well.
I considered PTFE, the problem I found though is that the bolts are secured with captive nuts on the inside of the van, theres a fair few mm’s on the outside of the bolt where its secured through the roof which the PTFE would not protect against water ingress. I think the idea is that the captive nut allows a small amount of play to make it easier to fit the bolts into the roof fixings. Agreed the PTFE would prevent leaking through the thread of the bolt, the silicone though filled the area between the outside of the bolt and the roof. I wish I’d taken a picture of that prior to fitting the rails.
 
Fitting awning rails to both sides of the van and wasn’t confident about water tightness. Then found all the horror stories about leaks through the roof rail fittings into the interior of the van. I found this thread which is really helpful:


I don’t intend fitting roof bars / rails though, just awning channel on both sides.

So I removed the rails and discovered I’d crushed the washers supplied with the rail as I think I over tightened them. the silicone sealant did appear to have sealed nicely around the bolts and may have been water tight as they were. But water getting into the van which is a 2019 Caravelle kept me up all night.

This is the solution I used to fit both the rails. I used EDPM roof washers, some stainless steel M6 bolts and some ordinary rubber tap washers (Proper ones)

I tested first using a scrap piece of aluminium the same depth as the awning rail with the bolt / washer combination for 24 hours using an ice cream container filled with water.

View attachment 105245View attachment 105246
View attachment 105324

Completely leak free after 24 hours and no sealant was used.

I also tested how much torque was needed to compress the EDPM washers sufficiently to create a seal without crushing them too much. 4 Newton Meters was the sweet spot I found.
View attachment 105247View attachment 105248View attachment 105249

View attachment 105322View attachment 105323

I used some plastic wedges to keep the rail lifted a bit whilst I lined up the bolts into the holes in the roof. I did still use a little silicone sealant in the bolt holes just as an extra line of defence.

If I was fitting roof rails I would use the method https://www.t6forum.com/threads/roof-rail-leak-free-fixing.6121/ but as I only need awning rails I chose to use bolts for a neater finish.

Using the washer combination also raises the awning rails a few mm’s off the roof. I wanted this to ensure water can drain fRon the roof gutter properly without being trapped in a slight gap between the rail and the roof.

hope this helps someone.
That's one of the best guides IV seen on the forum and a great idea ! Do you have any links to the washers and bolts used or a list of sizes used ,. Cheers
 
That's one of the best guides IV seen on the forum and a great idea ! Do you have any links to the washers and bolts used or a list of sizes used ,. Cheers
Hi, Sure - links below:

D6.0 (6.0mm x 16mm) Sealing Washer (Grey EPDM) - Stainless Steel (A2) (Pack of 20)
by Singularity Supplies
Learn more: D6.0 (6.0mm x 16mm) Sealing Washer (Grey EPDM) - Stainless Steel (A2) (Pack of 20): Amazon.co.uk: DIY & Tools


sourcing map Nylon Flat Washers M6 18mm OD 6mm ID 1.5mm Thickness for Faucet Pipe Water Hose, Pack of 50
by Ascot City
Learn more: https://www.amazon.co.uk/dp/B07MX96..._dp_V9NMDDQE2PPQQVWQJB8W?_encoding=UTF8&psc=1

M6 (6mm x 25mm) Button Head Screws Allen Socket Bolts A2 Stainless Steel Screws (Pack of 20): AmazonSmile: DIY & Tools

https://smile.amazon.co.uk/Button-Screws-Allen-Socket-Stainless/dp/B08DL5MKD6

Cheers,

Nick
Thanks nick that's great , think I'm going to do the same to mine !
 
Hi, and thanks for your help @moodsterT6. I copied what you did including the parts from your links and it works a treat.

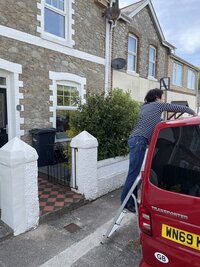
If anyone is planning to do it I suggest you get one of these as they make it so much easier for you. I was able to stand at the bedroom window to check it was aligned right.

D5933BDA-60D3-4D7E-827F-9A8F80B094F8.jpeg
 
Last edited:
Hi, and thanks for your help @moodsterT6. I copied what you did including the parts from your links and it works a treat.

If anyone is planning to do it I suggest you get one of these as they make it so much easier for you. I was able to stand at the bedroom window to check it was aligned right.

View attachment 116727
Good work! theres plenty of rain at the moment to test your fittings :)

So far mine have not leaked (at least I don’t think they have)
 
My rail has just arrived, so about to order the bits above to get it fitted. Stupid question, but do all of the washers go on the outside of the van, or do I need to remove roof lining to fit some of them inside.

Thanks

Steve
 
A Dowty bonded seal under the screw head and another under the rail will do the job. BZP finish or stainless steel.
The advantage over a rubber washer is it will not degrade or become compressed and loose.

*edit*
problematic link removed
 
Last edited by a moderator:
Back
Top