You are using an out of date browser. It may not display this or other websites correctly.
You should upgrade or use an alternative browser.
You should upgrade or use an alternative browser.
Drivers Door Adjustment
- Thread starter LambethBoy
- Start date
-
- Tags
- door seal
Yes on both...Passenger door is fine!Have you got the extra door seals fitted?
Can it not be adjusted in a little?
Adjusting striker pin
Adjustment is described only for the left door. Adjustment of the right door is analogous.
t The door must lock fully when closing without any additional force being required and must not have any play.
t The door must not be pushed up or down due to striker pin adjustment.
t Striker pin is correctly adjusted when lid lock recess engages with rotary latch central to striker pin.
Striker pin can be used to align front door flush with side panel (to reduce wind noise) -arrows-.
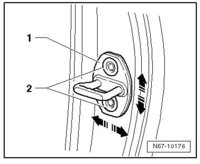
Loosen striker pin -1- by loosening bolts -2- on B-pillar.
Note
Substantial force must be applied to adjust striker pin -1- with bolts -2- loosened.
–
Adjust door by means of striker pin -1- so that the door is flush with the side panel when shut (to prevent wind noise).
–
Tighten bolts -2- of striker pin -1-.
Specified torques
Component
Specified torque
Striker pin
20 Nm
.
Adjusting door
Special tools and workshop equipment required
t Door alignment tool -3320-
t Universal joint for 3320 -3320/1-
t Bit for 3320 -3320/2-
t Bit for 3320 -3320/3-
t Torque wrench -V.A.G 1331-
t Socket -3410-
t Setting gauge -3371-
t Removal wedge -3409-
 Note
Note
The adjustment sequence is only for the left door. The right door is similar (components are not identical).
Adjusting door hinges
 Note
Note
t Vehicle must be standing on its wheels to enable front door to be adjusted.
t To ensure correct door adjustment, the door hinge on the A-pillar must be loosened. Other measures, such as raising the door, will prove pointless. Pressure from above will cause the door to drop again.
t The front door is adjusted correctly if the gaps/shut lines are even all around, the door is not too deep or does not stand proud and all contours align when the is door closed.
t To check gaps/shut lines → Rep. gr.00
t If there is a requirement to loosen the door hinge on the A-pillar from the interior, a M 8 multi-point socket from tool set -V.A.G 1816/2- can be used.
t Remove dash panel trim on left to allow for loosening and tightening door hinge bolt on inner A-pillar →General body repairs, interior; Rep. gr.70.
t The hinge bolts must always be renewed if loosened.
t After completing installation or adjustment, corrosion protection measures must be carried out on hinge and bolts.
Correct adjustment to achieve a flush fitting is carried out via the bolts on the door hinge.
Use door alignment tool -3320- with bit -3320/3-.
Top door hinges:
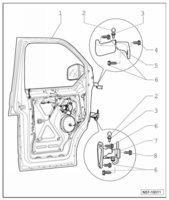
– To adjust upper section of door -1- at hinges -5-, loosen bolts -4- and -6-.
– For bolt -4-, remove dash panel trim on left →General body repairs, interior; Rep. gr.70.
Bottom door hinges:
– To adjust door -1- in lower area at hinges -7- loosen bolts -6- and -8-.
– For bolt -8-, remove dash panel trim on left →General body repairs, interior; Rep. gr.70.
Specified torque
.
Adjustment is described only for the left door. Adjustment of the right door is analogous.
t The door must lock fully when closing without any additional force being required and must not have any play.
t The door must not be pushed up or down due to striker pin adjustment.
t Striker pin is correctly adjusted when lid lock recess engages with rotary latch central to striker pin.
Striker pin can be used to align front door flush with side panel (to reduce wind noise) -arrows-.
Loosen striker pin -1- by loosening bolts -2- on B-pillar.
Note
Substantial force must be applied to adjust striker pin -1- with bolts -2- loosened.
–
Adjust door by means of striker pin -1- so that the door is flush with the side panel when shut (to prevent wind noise).
–
Tighten bolts -2- of striker pin -1-.
Specified torques
Component
Specified torque
Striker pin
20 Nm

.
Adjusting door
Special tools and workshop equipment required
t Door alignment tool -3320-
t Universal joint for 3320 -3320/1-
t Bit for 3320 -3320/2-
t Bit for 3320 -3320/3-
t Torque wrench -V.A.G 1331-
t Socket -3410-
t Setting gauge -3371-
t Removal wedge -3409-

The adjustment sequence is only for the left door. The right door is similar (components are not identical).
Adjusting door hinges

t Vehicle must be standing on its wheels to enable front door to be adjusted.
t To ensure correct door adjustment, the door hinge on the A-pillar must be loosened. Other measures, such as raising the door, will prove pointless. Pressure from above will cause the door to drop again.
t The front door is adjusted correctly if the gaps/shut lines are even all around, the door is not too deep or does not stand proud and all contours align when the is door closed.
t To check gaps/shut lines → Rep. gr.00
t If there is a requirement to loosen the door hinge on the A-pillar from the interior, a M 8 multi-point socket from tool set -V.A.G 1816/2- can be used.
t Remove dash panel trim on left to allow for loosening and tightening door hinge bolt on inner A-pillar →General body repairs, interior; Rep. gr.70.
t The hinge bolts must always be renewed if loosened.
t After completing installation or adjustment, corrosion protection measures must be carried out on hinge and bolts.
Correct adjustment to achieve a flush fitting is carried out via the bolts on the door hinge.
Use door alignment tool -3320- with bit -3320/3-.
Top door hinges:
– To adjust upper section of door -1- at hinges -5-, loosen bolts -4- and -6-.
– For bolt -4-, remove dash panel trim on left →General body repairs, interior; Rep. gr.70.
Bottom door hinges:
– To adjust door -1- in lower area at hinges -7- loosen bolts -6- and -8-.
– For bolt -8-, remove dash panel trim on left →General body repairs, interior; Rep. gr.70.
Specified torque

.
Thanks mate..! Loosened of striker latch earlier, didn’t realise I had to use ‘Substantial’ force to move it.Adjusting striker pin
Adjustment is described only for the left door. Adjustment of the right door is analogous.
t The door must lock fully when closing without any additional force being required and must not have any play.
t The door must not be pushed up or down due to striker pin adjustment.
t Striker pin is correctly adjusted when lid lock recess engages with rotary latch central to striker pin.
Striker pin can be used to align front door flush with side panel (to reduce wind noise) -arrows-.
Loosen striker pin -1- by loosening bolts -2- on B-pillar.
Note
force must be applied to adjust striker pin -1- with bolts -2- loosened.
–
Adjust door by means of striker pin -1- so that the door is flush with the side panel when shut (to prevent wind noise).
–
Tighten bolts -2- of striker pin -1-.
Specified torques
Component
Specified torque
Striker pin
20 Nm
View attachment 30389
.
Adjusting door
Special tools and workshop equipment required
t Door alignment tool -3320-
t Universal joint for 3320 -3320/1-
t Bit for 3320 -3320/2-
t Bit for 3320 -3320/3-
t Torque wrench -V.A.G 1331-
t Socket -3410-
t Setting gauge -3371-
t Removal wedge -3409-
Note
The adjustment sequence is only for the left door. The right door is similar (components are not identical).
Adjusting door hinges
Note
t Vehicle must be standing on its wheels to enable front door to be adjusted.
t To ensure correct door adjustment, the door hinge on the A-pillar must be loosened. Other measures, such as raising the door, will prove pointless. Pressure from above will cause the door to drop again.
t The front door is adjusted correctly if the gaps/shut lines are even all around, the door is not too deep or does not stand proud and all contours align when the is door closed.
t To check gaps/shut lines → Rep. gr.00
t If there is a requirement to loosen the door hinge on the A-pillar from the interior, a M 8 multi-point socket from tool set -V.A.G 1816/2- can be used.
t Remove dash panel trim on left to allow for loosening and tightening door hinge bolt on inner A-pillar →General body repairs, interior; Rep. gr.70.
t The hinge bolts must always be renewed if loosened.
t After completing installation or adjustment, corrosion protection measures must be carried out on hinge and bolts.
Correct adjustment to achieve a flush fitting is carried out via the bolts on the door hinge.
Use door alignment tool -3320- with bit -3320/3-.
Top door hinges:
– To adjust upper section of door -1- at hinges -5-, loosen bolts -4- and -6-.
– For bolt -4-, remove dash panel trim on left →General body repairs, interior; Rep. gr.70.
Bottom door hinges:
– To adjust door -1- in lower area at hinges -7- loosen bolts -6- and -8-.
– For bolt -8-, remove dash panel trim on left →General body repairs, interior; Rep. gr.70.
Specified torque
View attachment 30390
.
Will have another try tomorrow!
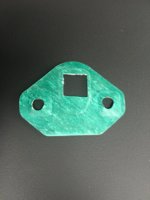
Not played with a front door striker plate but the rears have a kind of fibrous gasket behind them (im guessing to stop the metal on metal against body) which sticks to the surface so may need to loosen it off enough to pull the plate forwards a couple mm to break the seal/bond of the gasket if theres one present
Heres a picture of the rear one (that i have cut a square hole in to allow power latching motor)
Heres a picture of the rear one (that i have cut a square hole in to allow power latching motor)


Not played with a front door striker plate but the rears have a kind of fibrous gasket behind them (im guessing to stop the metal on metal against body) which sticks to the surface so may need to loosen it off enough to pull the plate forwards a couple mm to break the seal/bond of the gasket if theres one present
Heres a picture of the rear one (that i have cut a square hole in to allow power latching motor)
View attachment 30417
Good news!
It does move..!
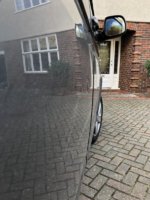
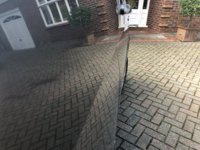
Managed to adjust the latch in about 2-3mm.
The door sits in nice now even with the extra trims. Sounds really nice on closing.
Before and after pics.
Well done..
Done a good job there.........
I had a similar issue where once I fitted the extra secondary door seal....
The drivers door was bouncing open..... pain inn the but.
I ended up swapping the drivers trim for the travelvolts versions that wasa bit more giving.....
Anyway my door is still a bit out......
Some might give it a go.
It’s a good idea just to use a felt tip pen to mark around the front edge and tops of your latch so that when you move it you can see how much it’s travelledWell done..
Done a good job there.........
I had a similar issue where once I fitted the extra secondary door seal....
The drivers door was bouncing open..... pain inn the but.
I ended up swapping the drivers trim for the travelvolts versions that wasa bit more giving.....
Anyway my door is still a bit out......
Some might give it a go.
My door was sticking out about 5mm from the factory, before I even fitted the seals, poor show really that it left the factory and didn't get picked up on the PDI either.
Since adjusted as per the above, it's not perfect, but I can't bring it in any more without the door refusing to shut so I've left it.
Since adjusted as per the above, it's not perfect, but I can't bring it in any more without the door refusing to shut so I've left it.
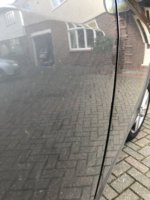
View attachment 30424 View attachment 30424 View attachment 30425
Good news!
It does move..!
Managed to adjust the latch in about 2-3mm.
The door sits in nice now even with the extra trims. Sounds really nice on closing.
Before and after pics.
Granted this was a while ago but I'm thinking I have the same issue on he passenger side, I'm getting a small leak from the very top of the door and on closer inspection the door has inwards travel (when pushed) so I'm guessing this is the issue. Did the striker pin have a gasket as mentioned?


No there’s no gasket mateGranted this was a while ago but I'm thinking I have the same issue on he passenger side, I'm getting a small leak from the very top of the door and on closer inspection the door has inwards travel (when pushed) so I'm guessing this is the issue. Did the striker pin have a gasket as mentioned?

No there’s no gasket mate
Nice one, will attempt this after work, cheers

Get yourself a felt tip pen and mark around the bracket so you can see the adjustment you’ve made. You might have to release off the screw quite a bit, not fully out, and give it a thump with a hammer to get it to shift.Nice one, will attempt this after work, cheers
just

just loosening the bolt doesn't free it, you have to give it a tapWill do... Ohh that much considerable force!

M8Just been out to it thinking it was a M10 spline, it's notany chance you can tell me the correct size, I'm guessing m8 but not sure.

