Another wiring diagram for scrutiny

middle-englander

Senior Member
T6 Guru
Hi all,

I've been putting off doing the electrics for my camper conversion off for a while (mainly since I know very little about electrics!), but I think I'm finally at the point where I'm ready to start buying things.
I have attached a diagram of what I think the installation will look like.

camper-electrics.jpg


The bits in the grey boxes (ie solar and EHU) are to come later. For now I'm just focusing on the core 12v bit.
Some general questions I have:
  1. I haven't included the switches for 12V appliances, but I generally planned on using cbe compliant switches in a cbe panel. Are these likely to be rated highly enough for the draw I have? I'm wary about using cheap switches and panels that are not rated highly enough.
  2. I'll also be installing an Ablemail trickle charger to top up my vehicle starter battery. I know it sits between the two batteries, but can I simply put some kind of splitter on the cable before it terminates on the DC50S, so that I can take one feed to the DC50S and the other to the Ablemail? If so, what should I be looking for? (Told you I know nothing of electrics!!!)
  3. I did consider putting the switches for the diesel heater and fridge much closer to the leisure battery and have separate switches for them, but I'd like all the switches to be in one place. This of course does mean the cable run is longer, but I think I'm covered with the cable sizing I'm using. Any issues with that?
Oh, and the Eco-Worthy may be replaced by Renogy bluetooth 100Ah model if I can stump up the cash.
Any feedback most welcome!

edit: shoutout to @Dellmassive for the wiring diagrams, you may notice that this is my inspiration!
 
Pretty similar to my setup too (not surprisingly since I started from Dellmassive!). For the earth points, don’t bother going all the way back to the battery or even the fusebox. Just earth battery to van, and loads to the nearest earth on the van, and your cable run is halved (so less voltage drop).

On mine the solar (100W) panel is enough to trickle charge, so maybe try it and see before you add another unit.

Diesel heater - mine is directly to the battery without switch, for best supply and also to avoid accidentally switching off before it finishes shutdown cycle. I’m debating with myself if I like that, or if I want to cut the tiny drain from the Bluetooth controller.

Similarly with my fridge - I started without isolation, but when the door is propped open for storage, the light stays on! It has a switch now, but via a relay so no worries over the quality of the switch.
 
Just couple of notes:

1. Fuse the starter battery to renogy with a bigger fuse, say 80A, from the starter side and smaller 60A from renogy side. Especially if starter side fuse goes to e-box (T6), you’ll want the easier accessible fuse be more likely to go first

2. Fuse 12V sockets individually with 15A fuses rather than one 30A fuse for them all. The sockets take about 10A max and 30A is just way too much for a single socket. Also, if you burn a fuse from one the two other will still work. Maybe something similar for usbs, group by 2 or 3 ports.
 
Initial thoughts:

You don't say what van you have which may help.

Where are you placing the items - the distance is an important factor in choosing the right cable size.

Generally fuse slightly higher at the end of the cable from the starter battery that is by the starter battery, the advantage of fusing both ends (if not using a relay that could stick on) is that the end in the van is more accessible so you want that to go first.

Compressor fridges tend to be voltage sensitive so they can benefit from the most direct and low voltage drop wiring. So long as the fridge you choose can be switched off (mostly) at the fridge itself I wouldn't make the wiring longer to loop in and out of common switch area.

DC-DC chargers will draw more current than they put out (as they boost voltage and have losses) so 60A in seems a bit low for a 50A charger - Renogy state a 75A minimum in the manual

Screenshot_20240124-181005-01.jpeg
 
Thanks chaps, great input! Points noted.

In response to specific questions, the van is a 2018 T30 102ps poverty line, which will be used for a mixture of on and off grid camping, none of it longer than a week in all likelihood. Occupants comprise of 2 adults, 2 children, and a slightly unhinged dog.

The locations are fairly typical for a camper, that is, most electrics under the driver seat, heater in that vicinity, fridge directly behind, and the majority of sockets and switches on the inside face of the "wardrobe".
I also plan to have a usb + 12v socket on both the passenger side c pillar and one somewhere near the tailgate. Given above advice I will cable and fuse these separately.
 
I'd be putting the solar wiring in too if you've not yet built the insides of the van, you don't want to be ripping stuff out to put wiring in - plan ahead for the future upgrades, it won't cost much to have the wiring in place.

On and I wouldn't switch the diesel heater, especially if you've got a remote for it.
 
Last edited:
On and I wouldn't switch the diesel heater, especially if you've got a remote for it.
But if you don't switch it make sure the fuse is accessible and not buried, same for the fridge.

You might need to replace it in hurry if you are camping.
You might need to fully power down and restart to clear odd states in both.

Also do your future self a favour and label everything. If you can borrow or have a label machine that's great but even if not a quick bit of good quality electric tape folded over a cable back on to itself and a fine sharpie to make a label tag is worth the effort.
 
You've got a few feeds going on to the leisure battery. Rather than crowding the terminals consider putting a couple of bus bars in - it might be tidier. If you do I'd put a single master fuse between it and the battery.

With the lights if you can I would try and put in 2 circuits fed from two different fuses - that way if you have an issue you'll not lose all the lights.

With the USB sockets I would switch that feed so you can stop the parasitic drain when the van is idle if needed.
 
Thanks guys.
The main EHU cable is actually in situ and is going to come in via the "stealth flap" under the driver side rear light. I have not done the same with the solar unfortunately, and all the furniture is in.

I have a twin slider so will probably utilise the space behind the furniture for some of the wiring and fuses.

Thinking about the lights, I will actually have two circuits anyway - one for the spotlights and another for the striplight in the kitchen overhead locker.

@roadtripper I hadn't considered a bus bar on the LB, thanks.
What is meant by parasitic draw on the USB sockets? Does that mean they will consume power even while nothing is plugged in to them?

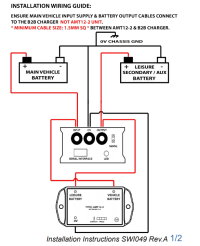
Does anybody have a view on the Ablemail trickle charger, specifically how I can splice / split the positive cable from vehicle battery to LB so I can take another feed to the Ablemail?
 
Does anybody have a view on the Ablemail trickle charger, specifically how I can splice / split the positive cable from vehicle battery to LB so I can take another feed to the Ablemail?
You don’t need to splice, the AM is connected with smaller cables direct into the appropriate terminals on the DC-DC alongside the existing cables.

IMG_6534.png
 
Ooh, that's good - I'm looking at using one for my Install too soo that makes things easier.

However, without solar feeding a (near) constant charge to the LB, I'm not sure the Ablemail will work well. I might be wrong but here's my thinking.

The threshold for charging the SB is when the LB is at 13.5v for lithium which it will only be at when it's fully charged, or being charged either from EHU, solar or the DC-DC charger.

You won't have solar or hookup installed, and there's no point in the trickle charger when your driving as the SB will be getting charged from the alternator. And it's unlikely to be at exactly 100% all the time so as soon as it drops below 13.5v the Ablemail won't do anything.

So, by all means install it - but be aware that it won't actually be doing anything until you've got solar.

I think. o_O :D
 
And it's unlikely to be at exactly 100% all the time so as soon as it drops below 13.5v the Ablemail won't do anything.
The instructions with my AMT12-2 say that it will also charge the SB if it drops below 12.1V and the LB has >12.4v (>13.1v for lithium). This should mean that the LB doesn’t need to be near full to provide some charge to the SB. For me I’m hoping it will sacrifice a bit of LB power to keep the SB at a level to allow starting and not leave me stranded. Clearly it won’t prevent it but will make it less likely.
 
I have a twin slider and I have put my consumer unit and 12v fuse box on the rear of the units.
In the void where the step would be I’ve got all my wiring concealed and then a cover board across the front with my 12v isolation switch on it.
It makes everything really easy to access.
 
I have a twin slider and I have put my consumer unit and 12v fuse box on the rear of the units.
In the void where the step would be I’ve got all my wiring concealed and then a cover board across the front with my 12v isolation switch on it.
It makes everything really easy to access.
Sounds good - my only (perhaps unfounded) concern would be how long the run of unprotected cable was up to the CU.
 
The instructions with my AMT12-2 say that it will also charge the SB if it drops below 12.1V and the LB has >12.4v (>13.1v for lithium). This should mean that the LB doesn’t need to be near full to provide some charge to the SB. For me I’m hoping it will sacrifice a bit of LB power to keep the SB at a level to allow starting and not leave me stranded. Clearly it won’t prevent it but will make it less likely.
Interesting nugget of information there!
Decisions decisions...at some point in the future I plan on getting something like a Noko jump starter in case all else fails. Between that and the solar perhaps I don't need the Ablemail.
Anyway at least if I do get one I know how to install it which was my main objective. :laugh:

In other news I've just bought a Renogy battery for the install. :cool:
 
Another question actually, the Renogy battery I've just bought has Bluetooth built in. Does that completely negate the need for the BT2 monitor or would it still be useful (plugged into the DC50)?
 
Back
Top