Flexible solar panel mounting to pop top

vRSG60

New Member
Hi all
I’m mounting a flexible solar panel to my pop top. The pop top has a ridge down the middle so I’m thinking of using the ABS corner pieces usually used to mount rigid panels. I’ll add countersink screws to the corners, my solar panel has 4 holes, 1 at each corner and bolt the solar panel down after fixing the corner pieces to the roof using the usual sealant method.IMG_2690.png
Anyone else used this method?
 
I’ve done something similar, bonded on some twin wall using double sided tape then bolted the panel to the twin wall using plastic bolts through the eye holes in the panel. Personally I think flexible panels are more likely to fail when bonded directly to the roof as there’s little ability to flex when they get hot

IMG_1930.jpeg
IMG_1927.jpeg
 
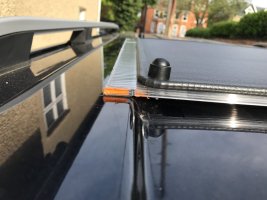
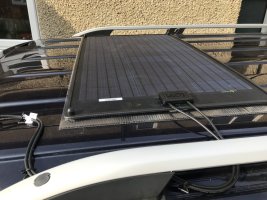
Nice one. I'm going to bond these aluminium rails to T6 pop top roof using very strong bonding tape (supplied by a company called Stik-On. It's stronger than 3M VHB. The Renogy 200W panel is bonded to a 10mm thick polycarbonate hollow roofing panel with 3M VHB.

Then, using the mounting holes in the panel, I'll then put M6 stainless bolts with a washer into the rail with a special slider bolt.

I think this should increase the overall lifetime of the flexible panel by giving it space to expand and contract and it also keeps it cooler having air flowing underneath.

I got this idea from US RV Youtube channel. Some people might say you are actually making a flexible like a rigid one but one this is certain - the panel with the poly stuck to the back is about half the weight of a rigid 200w aluminium framed panel.

IMG_20250607_211201.jpgIMG_20250607_211155.jpgIMG_20250607_211404.jpg
 
Nice one. I'm going to bond these aluminium rails to T6 pop top roof using very strong bonding tape (supplied by a company called Stik-On. It's stronger than 3M VHB. The Renogy 200W panel is bonded to a 10mm thick polycarbonate hollow roofing panel with 3M VHB.

Then, using the mounting holes in the panel, I'll then put M6 stainless bolts with a washer into the rail with a special slider bolt.

I think this should increase the overall lifetime of the flexible panel by giving it space to expand and contract and it also keeps it cooler having air flowing underneath.

I got this idea from US RV Youtube channel. Some people might say you are actually making a flexible like a rigid one but one this is certain - the panel with the poly stuck to the back is about half the weight of a rigid 200w aluminium framed panel.

View attachment 290639View attachment 290641View attachment 290642
Why not fit a rigid panel & be done with it? You’ve created a Frankenstein that has the disadvantages of both a flexible panel and a rigid panel. And negated the advantages of both I.e. the questionable longevity of a flexible panel & the height of a rigid panel.
 
There is that, but I reckon I'll get at least 10 years from the panel constructed like this. Plus the rails can then be re-used for another panel as well just by rearranging the rails by carefully removing the tape with panel wipe and a plastic blade or a fishing line pulled under the rails. It is also much easier to position on the pop top roof being less heavy than a rigid panel. That was the main consideration for a flexible panel rather than a rigid one. I'd rather minimise the weight loading on the roof.

I haven't actually noticed any pop tops with rigid solar panels mounted on them. Maybe it's not that common. I expect this is linked to the potential weight issue and the aesthetics.

It will be an interesting long term test. If I get at least 10 years then I'll take that as a win.
 
  • Like
Reactions: CAB
I brought a 200W flexible panel that is made to stick onto a surface with its own self adhesive backing, it has a 5 year guarantee, so the manufacturer (Austrian) must be confident it won’t degrade due to heat etc, not having an air gap underneath. Only weighs a few kg and less than 3 mm thick, ideal for a poptop
Clean roof area, mark out with masking tape, stick panel on roof, a 10 minute job
 
Last edited:
I brought a 200W flexible panel that is made to stick onto a surface with its own self adhesive backing, it has a 5 year guarantee, so the manufacturer (Austrian) must be confident it won’t degrade due to heat etc, not having an air gap underneath. Only weighs a few kg and less than 3 mm thick, ideal for a poptop
Clean roof area, mark out with masking tape, stick panel on roof, a 10 minute job
That's good that it has a 5 year warranty. I would still put an air gap underneath though because it's good engineering to reduce the risk of the panel overheating. It should increase the overall lifetime as well. You could mount the panel on some PVC strips to give a small air gap underneath.
 
That's good that it has a 5 year warranty. I would still put an air gap underneath though because it's good engineering to reduce the risk of the panel overheating. It should increase the overall lifetime as well. You could mount the panel on some PVC strips to give a small air gap underneath.
I would go for say, 3 or 4 PVC strips, each 25mm or something like that in width. Put them longitudinal on the back of the panel on the edges and 2 in the middle part. You'd want them to be around 3mm thick. Use 3M VHB or S-Bond 25mm double sided high strength bonding tape (from Stik-On www.stikon.co.uk) to stick strips to panel and then panel to roof.
 
I brought a 200W flexible panel that is made to stick onto a surface with its own self adhesive backing, it has a 5 year guarantee, so the manufacturer (Austrian) must be confident it won’t degrade due to heat etc, not having an air gap underneath. Only weighs a few kg and less than 3 mm thick, ideal for a poptop
Clean roof area, mark out with masking tape, stick panel on roof, a 10 minute job
I’d recommend a sheet of PPF first so if you do ever need to lift the panel it is a much easier job.
 
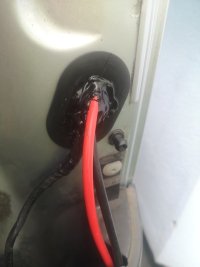
In terms of cable routing for the panel, I'm coming through the grommet for the offside rear light cluster wiring. I created a small hole and put both cables through. Then I used black polyurethane sealant to make a good seal. I find any poly stuff which sets quite firm will be fine. Usually the ones containing isocyanate work best.

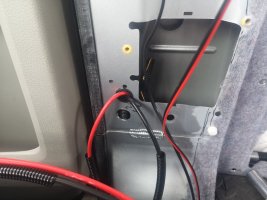
Solar cables being used are 6mm. Then it connects to the MC4 connectors (15A MC4 inline fuse on the positive cable) that are clipped to the inside lip of the pop top roof. It's a bit of a challenge getting the cables lined up to fit inside the light cluster assembly. Basically you have to put them into the cavity space by the bumper and then position them to the left side of the light cluster as you are looking at the light on the back. There's just enough space here for both of the cables. Then I plan to use 20mm conduit for clipping the cables up to where they exit from the light cluster to the top part of the space where the tailgate seal is.

Storm did mention to me that it would have been nicer looking to have the solar cable exit inside the van itself (I didnt get round to leaving a conduit in the vertical cavity space) but to be honest, I do prefer it being external for future maintenance convenience. I don't mind the somewhat industrial look. My g/f will most likely add some nice visually appealing things in the van to make it look less industrial 😉

Then it's time to ensure the correct length of cable is left to stop cables snagging when pop top is opened and closed. I used self adhesive cable tie holders that I upgraded by taking off the existing sticky pad and replacing it with proper grade doubled sided tape made by Tesa (you can get this from RS Components - item no: 768-2589). You can see the conduit I used in the photos as well. Really handy stuff along with the plastic cable guide tool as well.

I made a couple of 20mm holes for 20mm grommets where the seatbelt assembly is held. Also left in some smaller conduit sections for feeding in electrical cables connections when a kitchen and cupboard unit get installed here at a later date. For now, this set up is fine for me to see how it all works in the van. Floor covering is temporary until I can get round to install a proper Altro floor covering.

I'm really pleased with how it's all going so far. Nice to put my skills to the test here and to also achieve a big up from Storm who fitted the pop top. They said I did a very good job on the carpet lining.

IMG_20250610_125346.jpg

IMG_20250610_131356.jpg

IMG_20250610_131400.jpg

IMG_20250610_131407.jpg
 
Back
Top