DentedT6.1
Member
Hi all,
When we started our build we found some super useful pages relating to bits we were considering, so thought we'd contribute with our own pictures and lessons learned- in case anyone is thinking of doing their van a similar way. To aid anyone searching for their own build purposes, full specs are below:
Van
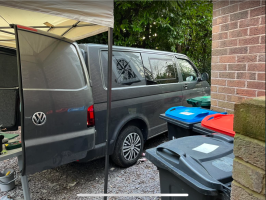
2020 VW T6.1 Startline T28
Iridium Grey
Ex delivery van
Build
Sound deadening + Insulation: Dodo Mat sound deadening and insulation pack MEDIUM van. Dodo matt DEADN flooring roll (double roll)
Carpet: Anthracite carpet from Harrisons Trim supplies, carpeted van in one instead of by panel
Windows: Passenger side OEM window, drivers side Safari window from Camperglass.
Flooring: T6 Battening Kit, Oak flooring Vanfurniture (again Seaside campers)
Furniture: VanFurniture (purchased though Seaside Campers) U Bed buffalo board with additional:
Swivel: Navigator Swivel seat Seaside campers (made by Jenkins)
Power (so far): Allpowers S2000 power station
Fridge (so far): Alpicool C15 camping fridge
Lighting (so far): Amazon LED light strip 5m
Other:
The build
We bought the VW T6.1 in November 2023 as an ex-fleet vehicle. It had a damaged side door and some dents around the sills, rear doors and passenger door, so we saved some on the overall cost. Priorities were low miles, good driving experience (ours has business package and apple car play etc.) and recent year.

We did however then buy an OEM door with window fitted and simply swapped the two. Not the cleanest break but this van is for adventures so we don't mind. (thanks to forum members on advice here!) On top of this, we paid a local converter to fit a Safari style window and remove the bulkhead (looking back, we could have done the bulkhead ourselves, but we were worried about learning to use the grinder- we ended up needing to grind later anyway!)
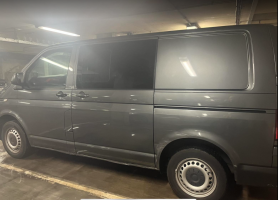
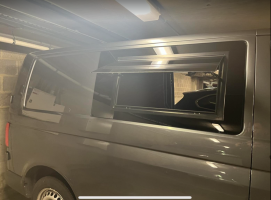
Then, over christmas we took a week and did the cleanout, sound deadening +insulation, and a few misc add-ons like the vinyl stickers and curtains. This was a few days work with 2-3 people dipping in and out, and was a lot easier than we thought, especially once we got the hang of it. The curtains were tricky- trying to push the little nubs together to fit them in the rail was a nightmare. My recommendation is to not screw in the stoppers until last, and slide the curtains onto the rail. It will save you hours of fiddling around. The curtains don't pull back all the way so you do lose a bit of window space to them, but I don't mind too much. They are extremely good at blackout though- so I'd recommend paying the extra £10 per pair for that.
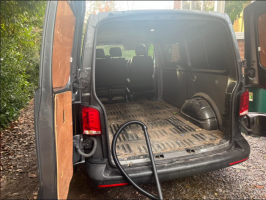
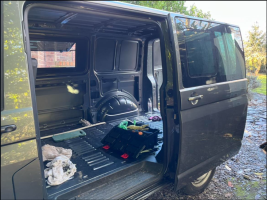
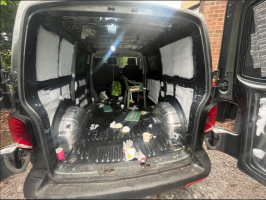
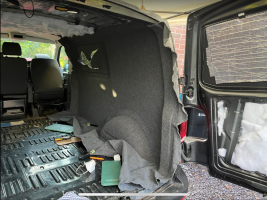
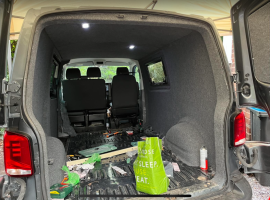
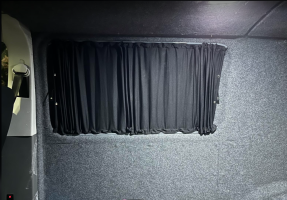
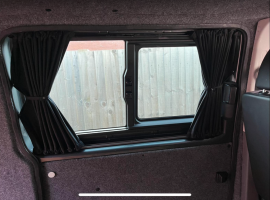
Into January, we paused to assess our first of the main choices (though colour of the carpet was a big discussion!). Furniture: Rock and roll or U Bed. We visited the guys in Seaside Campers who spent some time letting us play with the furniture and talking us through options. The guy there also jumped in our van to hold up different colours/elements of furniture to see how it looked! Top Service. Furniture ordered- we moved onto flooring.
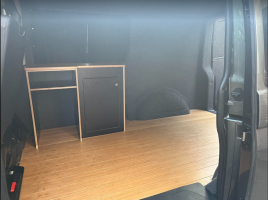
Goodbye sleep, hello stress. This was 100% my own fault, and both the people here and at Seaside campers have been supportive as we've re-laid this floor three times. The lessons learned here are simple- do it properly the first time.
The main issue with the floor was twofold, we used the VF 9mm oak floor and we had applied the DodoMatt DEADN.
Before we get started- treating the flooring with the Osmo Oil was a good way to save £100, or rather about £80 once you've bought the oil. Just follow the instructions exactly.
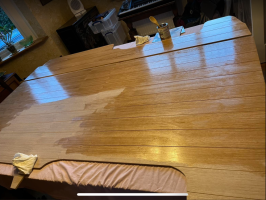
Attempt one: We followed the youtube tutorials and simply placed the ply on the deadn and screwed it down. We added some 9mm ply to the larger spaces in between the ridges, mainly just the rear part.
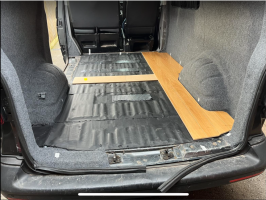
(above: you can even see my half hearted attempts to add spare sound deadening to raise the level, I should have stopped there- but I was determined)
Result: Flimsy feeling, very flexing floor that made us queasy. Friend said it'll be fine, I lost some sleep.
Attempt two: We pulled it up, and put down some more 9mm strips of wood in gaps around the floor on top of the DEADN. Again assuming that the deadon on top of the ridge would now be equal to the ply, sitting on top of the deadn on the low point of the ridge. Wrong. We placed it back down and found it still flexed but now in different places.
Attempt three: Fed up of doing it wrong, we went back to basics. We spent £110 on a battening kit (again, read time poor and facilities limited) and then pulled the floor up. Then armed with a stanley knife, wallpaper scraper and some solvent, we cut and scraped all the spaces where the battening kit needed to go down.
Believe me when I say this was the day I almost folded. Eight hours of scraping and cutting a material that is advertised as never coming up. This was painful- but as the conversion man said.. once it's done you'll be grateful you had one rough day and the floor is correct.
We then bonded the kit down with Sikaflex and relaid the floor, bonding it to the kit. In attempts 1 and 2 we had used screws, so we now have a somewhat scruffy floor that we'll need to stick some wood filler in- but lessons learned!
Result: Floor actually feels solid now. Thank god.
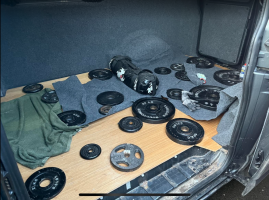
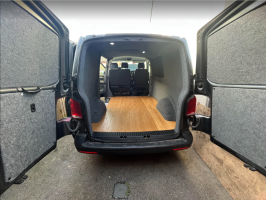
Lessons on the floor: follow the advice to put battens in first, bond instead of screwing, and do the insulation around the battens.
Also, whilst it's great to have the floor in, I'm not 100% on it being the right choice. It's very pretty, and any spec of dirt makes it look a mess- and the floor is constantly getting dirty. We'll get a mat and see if that helps, but currently that clean-oak look we were going for is hard to achieve.
Next- the swivel seat. A fitting so simple they didn't bother to include instructions. I should preface this by saying I've only ever fitted and used one, but my god this thing did our heads in. Firstly, it almost fits. That is to say I had to grind one of the holes to be slightly wider than it was originally for it to fit and then shove it down. Once on, it's worth noting that the drivers captain seat needs to be reclined with the armrest up for the seat to go round, and even then it's a bit tough. We're hoping it's easier as we go. The two levers make things much simpler to operate (the main benefit of spending more on this type of seat) but they do need to be exactly lined up for them to go down. So again, probably an experience thing. It is very well made and sturdy though- but watch as it raises the seat a fair way higher, so if you have a tall passenger they will be hitting their heads on the roof.
Flooring and swivel seat done, as above we spent easter weekend on the furniture.
On Furniture:
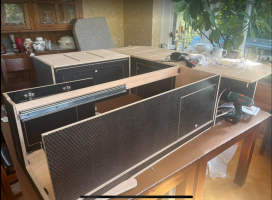
We decided to go with the VF Ubed setup in buffalo board. We added Oak worktops and table, the Sequoia table instead of the one on a rail, we also added the drawer (feels painful paying an extra £200 for something that's in the picture they advertise, and is actually a very simple drawer).
We ordered the furniture in early-mid January, and picked it up mid-March. The advice I'd give here is that the lead times are all very loose, we upgraded our cushions from the standard to the Chenille Zinc, and were told that might take up some extra time. We did make the mistake of staying we weren't in a rush though- so that might have counted against us.
With all our upgrades, and minus the VF Winter sale, we paid £2088. This is a lot, but for time poor couples with limited access to space (most work being done on friends drives when able), it worked for us. We decided not to get the worktop pre-cut (free service anyway) as we wanted to get the single hop and sink instead of the double, VF said they could only cut the double so in future we'll have to do that ourselves.
Positives:

Electrics and other:
I then chucked in our Allpowers, plugged in the cheap LED's and also added a mounted plug kit. This is a pretty basic setup so we don't have to open the door in order to plug in a charger, but also means we can pull the plug out in future and put it direct into an EHU extension cable (which we've bought for £45 from go outdoors).
We (read, I) chickened out of doing a full electrical setup straight away for a few reasons. The main ones being cost and time. With the nice weather approaching and lots of costs hitting the piggy bank, we wanted to prioritise having a working camper, even if that means a few half measures for our first season of camping. As such, we are currently running:
Allpowers S2000 (bought on sale for £631)
We've just bought an Alpicool C15 for £140 from amazon, which we intend to see us through the summer. We have an EHU cable that everything will plug into, and expect the Allpowers to see us through a night or two off grid, but we're not looking for more.
The future:
We have a lot on the backlog! Currently we're expecting:
If this post seems to be useful for people then I'll happily add some more to it- if there are any questions about specific parts of the build then let me know and I'll do my best to answer.
Thanks all!
When we started our build we found some super useful pages relating to bits we were considering, so thought we'd contribute with our own pictures and lessons learned- in case anyone is thinking of doing their van a similar way. To aid anyone searching for their own build purposes, full specs are below:
Van
2020 VW T6.1 Startline T28
Iridium Grey
Ex delivery van
Build
Sound deadening + Insulation: Dodo Mat sound deadening and insulation pack MEDIUM van. Dodo matt DEADN flooring roll (double roll)
Carpet: Anthracite carpet from Harrisons Trim supplies, carpeted van in one instead of by panel
Windows: Passenger side OEM window, drivers side Safari window from Camperglass.
Flooring: T6 Battening Kit, Oak flooring Vanfurniture (again Seaside campers)
Furniture: VanFurniture (purchased though Seaside Campers) U Bed buffalo board with additional:
- Pull out drawer
- Upgraded cushions
- Oak worktop and table
- Sequoia table
Swivel: Navigator Swivel seat Seaside campers (made by Jenkins)
Power (so far): Allpowers S2000 power station
Fridge (so far): Alpicool C15 camping fridge
Lighting (so far): Amazon LED light strip 5m
Other:
- VanX side step and rear threshold combo
- VW T6.1 full length rear panels (ebay £60)
- Ebay wheel covers (the steelies were not endearing)
- VDubs Window wind deflectors
- Veedubs dashboard seal (fantastic addition)
- Veedubs "sounds like a golf" door seals (doesn't sound like a golf, sounds like a less tinny T6, but does make for a quieter drive and thoroughly recommended)
The build
We bought the VW T6.1 in November 2023 as an ex-fleet vehicle. It had a damaged side door and some dents around the sills, rear doors and passenger door, so we saved some on the overall cost. Priorities were low miles, good driving experience (ours has business package and apple car play etc.) and recent year.

We did however then buy an OEM door with window fitted and simply swapped the two. Not the cleanest break but this van is for adventures so we don't mind. (thanks to forum members on advice here!) On top of this, we paid a local converter to fit a Safari style window and remove the bulkhead (looking back, we could have done the bulkhead ourselves, but we were worried about learning to use the grinder- we ended up needing to grind later anyway!)


Then, over christmas we took a week and did the cleanout, sound deadening +insulation, and a few misc add-ons like the vinyl stickers and curtains. This was a few days work with 2-3 people dipping in and out, and was a lot easier than we thought, especially once we got the hang of it. The curtains were tricky- trying to push the little nubs together to fit them in the rail was a nightmare. My recommendation is to not screw in the stoppers until last, and slide the curtains onto the rail. It will save you hours of fiddling around. The curtains don't pull back all the way so you do lose a bit of window space to them, but I don't mind too much. They are extremely good at blackout though- so I'd recommend paying the extra £10 per pair for that.


Into January, we paused to assess our first of the main choices (though colour of the carpet was a big discussion!). Furniture: Rock and roll or U Bed. We visited the guys in Seaside Campers who spent some time letting us play with the furniture and talking us through options. The guy there also jumped in our van to hold up different colours/elements of furniture to see how it looked! Top Service. Furniture ordered- we moved onto flooring.
Goodbye sleep, hello stress. This was 100% my own fault, and both the people here and at Seaside campers have been supportive as we've re-laid this floor three times. The lessons learned here are simple- do it properly the first time.
The main issue with the floor was twofold, we used the VF 9mm oak floor and we had applied the DodoMatt DEADN.
Before we get started- treating the flooring with the Osmo Oil was a good way to save £100, or rather about £80 once you've bought the oil. Just follow the instructions exactly.

Attempt one: We followed the youtube tutorials and simply placed the ply on the deadn and screwed it down. We added some 9mm ply to the larger spaces in between the ridges, mainly just the rear part.

(above: you can even see my half hearted attempts to add spare sound deadening to raise the level, I should have stopped there- but I was determined)
Result: Flimsy feeling, very flexing floor that made us queasy. Friend said it'll be fine, I lost some sleep.
Attempt two: We pulled it up, and put down some more 9mm strips of wood in gaps around the floor on top of the DEADN. Again assuming that the deadon on top of the ridge would now be equal to the ply, sitting on top of the deadn on the low point of the ridge. Wrong. We placed it back down and found it still flexed but now in different places.
Attempt three: Fed up of doing it wrong, we went back to basics. We spent £110 on a battening kit (again, read time poor and facilities limited) and then pulled the floor up. Then armed with a stanley knife, wallpaper scraper and some solvent, we cut and scraped all the spaces where the battening kit needed to go down.
Believe me when I say this was the day I almost folded. Eight hours of scraping and cutting a material that is advertised as never coming up. This was painful- but as the conversion man said.. once it's done you'll be grateful you had one rough day and the floor is correct.
We then bonded the kit down with Sikaflex and relaid the floor, bonding it to the kit. In attempts 1 and 2 we had used screws, so we now have a somewhat scruffy floor that we'll need to stick some wood filler in- but lessons learned!
Result: Floor actually feels solid now. Thank god.


Lessons on the floor: follow the advice to put battens in first, bond instead of screwing, and do the insulation around the battens.
Also, whilst it's great to have the floor in, I'm not 100% on it being the right choice. It's very pretty, and any spec of dirt makes it look a mess- and the floor is constantly getting dirty. We'll get a mat and see if that helps, but currently that clean-oak look we were going for is hard to achieve.
Next- the swivel seat. A fitting so simple they didn't bother to include instructions. I should preface this by saying I've only ever fitted and used one, but my god this thing did our heads in. Firstly, it almost fits. That is to say I had to grind one of the holes to be slightly wider than it was originally for it to fit and then shove it down. Once on, it's worth noting that the drivers captain seat needs to be reclined with the armrest up for the seat to go round, and even then it's a bit tough. We're hoping it's easier as we go. The two levers make things much simpler to operate (the main benefit of spending more on this type of seat) but they do need to be exactly lined up for them to go down. So again, probably an experience thing. It is very well made and sturdy though- but watch as it raises the seat a fair way higher, so if you have a tall passenger they will be hitting their heads on the roof.
Flooring and swivel seat done, as above we spent easter weekend on the furniture.
On Furniture:
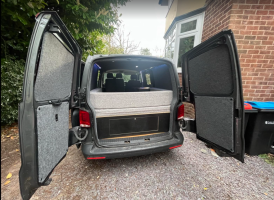
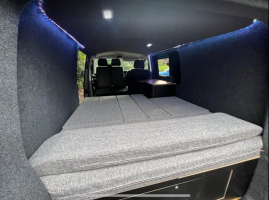
We decided to go with the VF Ubed setup in buffalo board. We added Oak worktops and table, the Sequoia table instead of the one on a rail, we also added the drawer (feels painful paying an extra £200 for something that's in the picture they advertise, and is actually a very simple drawer).
We ordered the furniture in early-mid January, and picked it up mid-March. The advice I'd give here is that the lead times are all very loose, we upgraded our cushions from the standard to the Chenille Zinc, and were told that might take up some extra time. We did make the mistake of staying we weren't in a rush though- so that might have counted against us.
With all our upgrades, and minus the VF Winter sale, we paid £2088. This is a lot, but for time poor couples with limited access to space (most work being done on friends drives when able), it worked for us. We decided not to get the worktop pre-cut (free service anyway) as we wanted to get the single hop and sink instead of the double, VF said they could only cut the double so in future we'll have to do that ourselves.
Positives:
- It is really, really nice. Looks good, feels good- exactly as we wanted it
- We struggled on the decision for U bed of rock and roll, but this just feels so homely and nice, and the bed is massively wide. Quite short, but very wide
- Surprising amount of space and ability to access it
- It's sometimes more door than wall- and I seem to need every one of them already- fantastic
- It fitted the van without any scribing needed, a godsend as that would have been a pain
- There are basically no instructions-
- There were about 4 diagrams for our whole build and they were all focussed on LWB anyway. Prepare to take your time and have at least two people- this was tough going. If you love Ikea and you're minded for this kind of thing you'll find it easier- but we hate flat pack and we're both office working lurkers- so it was heavy going. I'd budget around 2 full days for the build if you're new- and it's much, much better to do it indoors if you can. All the furniture is assembled in pieces so it's no problem getting it out and into the van.
- It's flimsier than it should be
- I wasn't confident lifting it up and carrying it without breaking as each bit seemed to move slightly. This might be a reflection on my building skills, but the pieces they provide to join the wood are incredibly difficult (read cheap, small) to get a good joint out of. In the end I went to B&Q, picked up 10 corner braces for £10 and fixed them into the places I was worried about- problem solved- an absolute must if doing again.
- I followed suit with fixing to the floor, I picked up 10 large brackets and used them to fix. I couldn't imagine trying to use the little black corner fixings to screw it to the floor, one pothole and my new furniture would be the next Apollo mission.
- It will need some sanding, so wear gloves and get a bit of sandpaper ready
- Not really a negative, just a pointer if you're new like we were!
- We were (are still) missing pieces, quite a few pieces:
- Table leg and base
- Three doors locks and fixings
- Two hinges for the smaller kitchen door
- We are three weeks on and we haven't had these. The table leg was known at delivery, and the rest we found a week ago. This is the only real main gripe I have- luckily nothing that stopped our build on easter weekend but for £2k and 2 months wait I would expect them to check they're sending it all.


Electrics and other:
I then chucked in our Allpowers, plugged in the cheap LED's and also added a mounted plug kit. This is a pretty basic setup so we don't have to open the door in order to plug in a charger, but also means we can pull the plug out in future and put it direct into an EHU extension cable (which we've bought for £45 from go outdoors).
We (read, I) chickened out of doing a full electrical setup straight away for a few reasons. The main ones being cost and time. With the nice weather approaching and lots of costs hitting the piggy bank, we wanted to prioritise having a working camper, even if that means a few half measures for our first season of camping. As such, we are currently running:
Allpowers S2000 (bought on sale for £631)
- 2000W inverter with 4000W peak (I ran my Dremel off it during the build)
- 1500wh lithium battery
- 4 USB's
- 2 USB C's
- 4 AC sockets
We've just bought an Alpicool C15 for £140 from amazon, which we intend to see us through the summer. We have an EHU cable that everything will plug into, and expect the Allpowers to see us through a night or two off grid, but we're not looking for more.
The future:
We have a lot on the backlog! Currently we're expecting:
- Doing a proper electrical setup. This will take time and money, both of which we've exhausted with the build so far, so it's pushed back for a while
- Adding a diesel heater- before making the investment we want to see how the van performs, we're both avid tent campers so just having a metal shell feels like a huge upgrade
- To pop or not to pop... We're two youngish campers with no kids and no pets- we're not desperate for a pop top right now, but we'll see how 2024 turns out
If this post seems to be useful for people then I'll happily add some more to it- if there are any questions about specific parts of the build then let me know and I'll do my best to answer.
Thanks all!


