Ultimate Bike Van

Andysredmini

Member
T6 Pro
Hi All
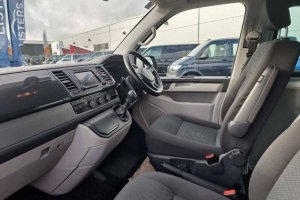
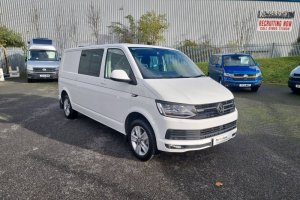
Just picked up my first van. A LWB T6 highline 4motion. My daughter races road bikes and cyclocross at Under 14 national level and I’m struggling to get all the kit in our trusty Ford S-max.
My long term plan is to build two 60” motorised drawers on the floor with two 60” motorised bike platforms above that turn into a bed when not used for carrying bikes. I work in research and development and have access to a massive amount of machinery including an SLS 3d printer, milling machines, lathes, welders etc.
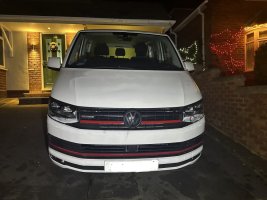
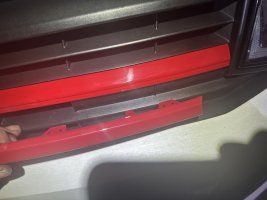
First job was to make the van a little less white van man ish so I added some red bumper and grill trims. I bought the pair from the same company but the colour varied massively between the two so they are being returned to the shop for them to have a look at and hopefully find me a matching pair.
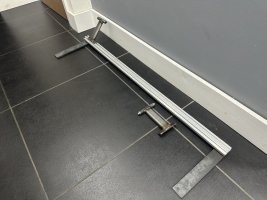
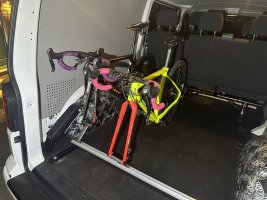
Second job was to make a temporary bike rack to get me to this weekend’s race. She has to have two bikes for a cyclocross race as it gets so muddy they sometimes have to change bike every lap. I’m not fully committed to my plan above (drawers,rack,bed) so in the short term my plan is to use the van and figure out exactly what I want. I had some scrap prototype aluminium extrusion and knocked up a couple of L-brackets and bushes to bolt it down to the tie down points by the rear door. It’s not a very efficient use of the space but will be ok for the short term.

I’ll update as I go along.

Thanks for listening

Andy
55C39E58-8A29-4989-89A8-3BF6AB2F36E1.jpeg

EB1A91C0-8053-41B3-9311-F0CED2364263.jpeg

05ED553B-98AF-4334-84C3-F40289BCD1CA.jpeg

37E5D789-EF30-49A8-BD33-5337A02CB914.jpeg

EC617757-F562-4DBD-9570-3081E4C00F90.jpeg

BFB90151-75C2-4E4E-B3E5-B889783F7328.jpeg
 
welcome! watching thread with keen interest, good luck
 
Hi Andy. Interesting build. I've recently sold my T6 Kombi but had the same bike transport issue with my kids. I built a wooden platform above the wheel arches and then used front fork mounts with the bikes transversely. The van was SWB but we could still get 4 road or CX bikes transversely mounted without adjusting saddles and then there's a huge amount of storage space under the platform. The modified version hinged so we could reach the stuff that rolled forwards behind the bulkhead! Wheels slotted in bags between the frames. With a LWB like yours it'll be easy!
Happy building!
(It did take 3 x 29" MTBs too but needed different fork mounts as the stem distance is shorter. I'll say Hi if I see your van at a race.

KR

Matt
 
Evening all.
Slow progress but at least it’s progress.
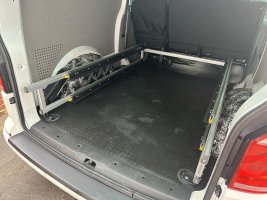
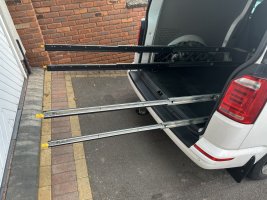
I spent far too much time over the Xmas holiday working in the rain trying to figure out the best way to achieve what I wanted. I made loads of slotted temporary brackets to help me try different options before committing to getting parts laser cut. In the end I ordered some 1500mm angles and a few different length fixing brackets that bolt to the original floor fixings meaning I can easily remove the racking and refit without having any adjustment to worry about. The aluminium extrusion is an old version from a work project and I designed and 3d printed some end caps to make them look a bit tidier.
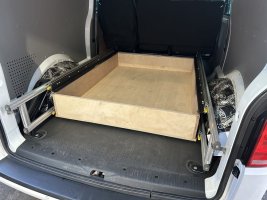
I spent far too long on the metalwork but I wanted to use every millimetre of space available. The drawers are 1500mm long and pushed back into the van as far as possible whilst still allowing the rear seats to tip. It works out that I can just about fit an aqua roll water container behind the drawers (for washing her bikes in the cyclocross pits)
I based the drawer heights on my saddle height which is 1020 and worked down from the door frame.
The bottom drawer is about 205mm high and the top drawer leaves a clear opening height of about 1030mm.
The drawers sit on steel angles meaning I can remove them in a few minutes and I have designed the top drawer to flip over which means it sits higher than the wheel arches so hopefully I can fit a full size airbed on top??? for weekends away.
I had to drill the body (door frame) either side a fit a rivnut so I could fit some brackets to prevent lateral movement. I drilled then applied two coats of galv paint to prevent rust. I now need to design some nicer looking brackets as my temporary ones are made from bent steel and penny washers.

I have left the drawers unglued and unpainted at the moment as I want to make sure I’m happy with them. I want to design some handles that fit near the drawer runner levers that when lifted operate the levers at the same time as allowing me to pull the drawer out. If not I’ll cut out some slots to grab onto.

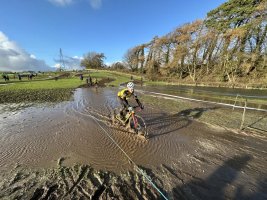
I have also attached a pic of Jaime competing at a national CX race last weekend to show how muddy it gets.

Thanks

Andy

4A2BD418-A17C-4358-923A-AB34F7827041.jpeg

0DD5E6F4-3BDF-4C86-A646-043EB7416E8A.jpeg

7BD1A71B-ABC0-449C-B441-1EB291384370.jpeg

B5D12397-E6C0-4DFD-9878-1BD8AB78353D.jpeg
 
Last edited:
Very elegant design, I like the way you make use of all the available space, and have it dual purpose.

We were at the Nationals on Sunday, doing the sign on. A heavy duty course!
 
Evening all.
Slow progress but at least it’s progress.
I spent far too much time over the Xmas holiday working in the rain trying to figure out the best way to achieve what I wanted. I made loads of slotted temporary brackets to help me try different options before committing to getting parts laser cut. In the end I ordered some 1500mm angles and a few different length fixing brackets that bolt to the original floor fixings meaning I can easily remove the racking and refit without having any adjustment to worry about. The aluminium extrusion is an old version from a work project and I designed and 3d printed some end caps to make them look a bit tidier.
I spent far too long on the metalwork but I wanted to use every millimetre of space available. The drawers are 1500mm long and pushed back into the van as far as possible whilst still allowing the rear seats to tip. It works out that I can just about fit an aqua roll water container behind the drawers (for washing her bikes in the cyclocross pits)
I based the drawer heights on my saddle height which is 1020 and worked down from the door frame.
The bottom drawer is about 205mm high and the top drawer leaves a clear opening height of about 1030mm.
The drawers sit on steel angles meaning I can remove them in a few minutes and I have designed the top drawer to flip over which means it sits higher than the wheel arches so hopefully I can fit a full size airbed on top??? for weekends away.
I had to drill the body (door frame) either side a fit a rivnut so I could fit some brackets to prevent lateral movement. I drilled then applied two coats of galv paint to prevent rust. I now need to design some nicer looking brackets as my temporary ones are made from bent steel and penny washers.

I have left the drawers unglued and unpainted at the moment as I want to make sure I’m happy with them. I want to design some handles that fit near the drawer runner levers that when lifted operate the levers at the same time as allowing me to pull the drawer out. If not I’ll cut out some slots to grab onto.

I have also attached a pic of Jaime competing at a national CX race last weekend to show how muddy it gets.

Thanks

Andy

View attachment 185778

View attachment 185779

View attachment 185780

View attachment 185781
Looks spot on that
 
Evening all.
Slow progress but at least it’s progress.
I spent far too much time over the Xmas holiday working in the rain trying to figure out the best way to achieve what I wanted. I made loads of slotted temporary brackets to help me try different options before committing to getting parts laser cut. In the end I ordered some 1500mm angles and a few different length fixing brackets that bolt to the original floor fixings meaning I can easily remove the racking and refit without having any adjustment to worry about. The aluminium extrusion is an old version from a work project and I designed and 3d printed some end caps to make them look a bit tidier.
I spent far too long on the metalwork but I wanted to use every millimetre of space available. The drawers are 1500mm long and pushed back into the van as far as possible whilst still allowing the rear seats to tip. It works out that I can just about fit an aqua roll water container behind the drawers (for washing her bikes in the cyclocross pits)
I based the drawer heights on my saddle height which is 1020 and worked down from the door frame.
The bottom drawer is about 205mm high and the top drawer leaves a clear opening height of about 1030mm.
The drawers sit on steel angles meaning I can remove them in a few minutes and I have designed the top drawer to flip over which means it sits higher than the wheel arches so hopefully I can fit a full size airbed on top??? for weekends away.
I had to drill the body (door frame) either side a fit a rivnut so I could fit some brackets to prevent lateral movement. I drilled then applied two coats of galv paint to prevent rust. I now need to design some nicer looking brackets as my temporary ones are made from bent steel and penny washers.

I have left the drawers unglued and unpainted at the moment as I want to make sure I’m happy with them. I want to design some handles that fit near the drawer runner levers that when lifted operate the levers at the same time as allowing me to pull the drawer out. If not I’ll cut out some slots to grab onto.

I have also attached a pic of Jaime competing at a national CX race last weekend to show how muddy it gets.

Thanks

Andy

View attachment 185778

View attachment 185779

View attachment 185780

View attachment 185781
I’d recognise that puddle anywhere, Westmorland by any chance?!

Good choice getting a T6, you’ll be in good company at bike races as they are a very popular choice.

We usually transport our bikes inside the van but also have a tailgate bike rack which is really handy if the bikes are filthy after an event and we haven’t got a jet wash with us, like yesterday where both bikes were carrying a good 5kg of mud by the end.
 
Morning.

A bit more progress made over the last few days.
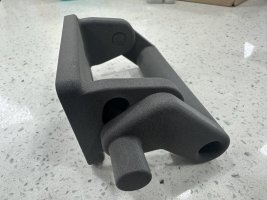
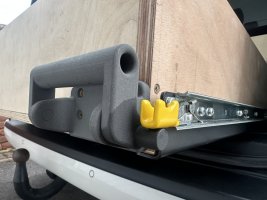
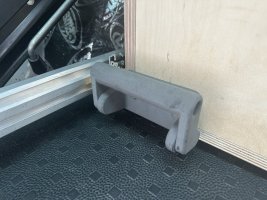
I have spent a few lunchtimes designing some handles for the drawers that when pulled operate the locking catch on the drawer slides. It’s taken a bit of working out but overall they have turned out really well. They incorporate the hinge and a pin to lift the catch. I also designed a pair of stop pins in a curved slot that prevents the handle rotating too far putting too much upward pressure on the drawer slide catch. I designed them to be printed in one piece with clearances for moving parts. These are the first prototypes and I need to change the fixing hole positions so I can bolt through from the back. I also want to remove some of the bulk and slim them down on version 2 plus I want to see if I can incorporate a return spring as they don’t always fully return to closed after use.

9DD2350A-4A52-48C1-95E1-9D908AF75AE7.jpeg

D2958317-B8D8-4D50-B74B-2E94B1C363DB.jpeg

29A5BAE5-5E9E-481F-A94D-ED3D3C1E1875.jpeg

48D6892E-B7CC-4844-81E0-9EB58FB48B32.jpeg

758B0045-4EA3-41D0-9653-47836F5EF523.jpeg
 
Last edited:
The puddle above was at Westmorland. The kids had tougher conditions than the adults as they changed the course and drained some of the puddles.
 
Morning.

A bit more progress made over the last few days.
I have spent a few lunchtimes designing some handles for the drawers that when pulled operate the locking catch on the drawer slides. It’s taken a bit of working out but overall they have turned out really well. They incorporate the hinge and a pin to lift the catch. I also designed a pair of stop pins in a curved slot that prevents the handle rotating too far putting too much upward pressure on the drawer slide catch. I designed them to be printed in one piece with clearances for moving parts. These are the first prototypes and I need to change the fixing hole positions so I can bolt through from the back. I also want to remove some of the bulk and slim them down on version 2 plus I want to see if I can incorporate a return spring as they don’t always fully return to closed after use.

View attachment 187829

View attachment 187830

View attachment 187831

View attachment 187832

View attachment 187833
Really smart, and a nice smooth print as well. I like the rounded edges. Which material did you print with?
 
Back
Top