Grinding noise, drive resistance and ABS error after standing T5.1 4motion

drooke

Member
VIP Member
T6 Pro
Got a new problem developing on my T5.1 2.0 BiTDi 4motion. I thought it was the brakes binding so changed disks and pads all round but problem still present. Let me try and describe it...

After leaving it parked for a few hours, about 4 hours is the shortest time, on pulling away I hear a "grinding" noise and feel excessive resistance against the engine and will then often get ABS errors appearing on the dash. The noise is not constant, seems to vary with speed. After driving for about 50 metres the noise disappears completely and the same for the feeling of resistance. ABS stay for a while and then disappear.

It's an odd problem to describe, hope this rings some bells with someone.

Thanks,

Dan
 
There is a known problem with some of the abs modules, where they jack on the brakes specifically in diagonally plane not sure about the t5.1 but I now the t6 uses the same module as the golf mk7 and this is common, you can get the module overhauled if this is your fault
 
Okay thanks. Couldn't find anything on the module issues yet. I've found people talking about dirty ABS sensors and cleaning/replacing them.

I've got OBDEleven so can do a fault scan, van has just gone in for some paint work though so will have to wait until it's back.
 
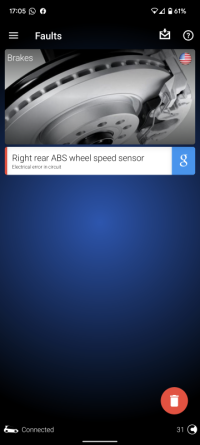
Got my van back tonight and I've done a fault code scan. The rear right ABS sensor is throwing errors. I'm hoping that means my control module is good and I just need to clean/replace that sensor. Could also be a loose connection/wiring. Will have a look in some light.
 
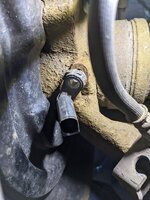
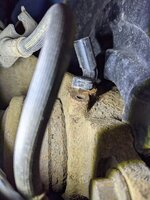
Had a proper look tonight at the rear right ABS sensor. Took the wiring connector off and undid the bolt but removing the sensor itself, the plastic body of it, seemed impossible, didn't want to stress it too much. It was like the sensor had corroded and wasn't budging.

Any thoughts on how to remove this please?

PXL_20210325_175801680.jpg

PXL_20210325_175806253.jpg
 
Check the resistance of the sensor and compare to the othe side if you can’t get it out and it’s fault best way is to drill it out with a smallish drill but
 
Wanted to give an update on this in case it's useful for others.

I've had a few attempts at this but managed to get the old sensor out today. I followed this type of method

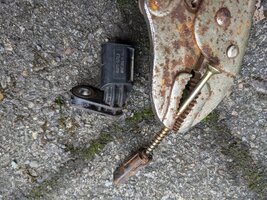
I removed the top part of the old sensor. Heated up a screw with a heat gun and screwed it into the remains of the sensor. Cooled it with water. Attached mole grips to the screw and levered it out. I didn't think it was going to give at first and didn't want to snap the screw but applied a bit more pressure and it came out. Cleaned up the hole and the surface ready for the new sensor, hoovered it out as well to remove any bits. Applied some grease to the new sensor and gently tapped it in. Secured with the bolt. I cleared the error codes and all good so far after a couple of short runs out.

Ended up costing me £30 for a new Bosch sensor and £14 for a heat gun.

PXL_20210516_101424029.jpg
 
Wanted to give an update on this in case it's useful for others.

I've had a few attempts at this but managed to get the old sensor out today. I followed this type of method

I removed the top part of the old sensor. Heated up a screw with a heat gun and screwed it into the remains of the sensor. Cooled it with water. Attached mole grips to the screw and levered it out. I didn't think it was going to give at first and didn't want to snap the screw but applied a bit more pressure and it came out. Cleaned up the hole and the surface ready for the new sensor, hoovered it out as well to remove any bits. Applied some grease to the new sensor and gently tapped it in. Secured with the bolt. I cleared the error codes and all good so far after a couple of short runs out.

Ended up costing me £30 for a new Bosch sensor and £14 for a heat gun.

View attachment 116369
Brilliant job they are a shitbag to get out, did you feel the colour drain from you face when it snapped lol, I’ve gently sanded the body of new ones in the past to reduce the size and to retain grease just incase they go again but never had to redo them so but of wasted time I suppose
 
Haha, yeah I wasn't impressed when I realised the top had snapped off the bottom part - I wasn't prepared for that so left it and came back to it!

The new one was tight to get in even with grease, sanding the plastic is probably not a bad idea before putting it in.
 
Haha, yeah I wasn't impressed when I realised the top had snapped off the bottom part - I wasn't prepared for that so left it and came back to it!

The new one was tight to get in even with grease, sanding the plastic is probably not a bad idea before putting it in.
It’s when you commit to it with a couple of taps you think oh shit have to continue and hope it don’t snap lol
 
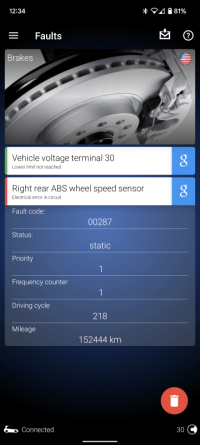
Resurrecting this thread because sadly I have another fault code with the replacement sensor in the same rear right corner :( The replacement sensor was a Bosch sensor and it's only a year old so it seems unlikely that this would fail to me.

The fault this time appears consistently and immediately on starting the van, even after clearing fault codes with OBDEleven. With the previous fault a year ago, the error was much more intermittent and would appear and disappear through the course of a drive.

Are there any other possible causes for this fault code and any way to diagnose please? I've heard rumours of a design flaw with the wiring loom somewhere near the sensor that could be the culprit but don't have more info on it.


Screenshot_20220524-123400.png

Thanks,

Dan
 
I had a similar issue and found this info on the fault that occurs in the loom, which I think is what you are talking about. See post 20 here.
I initially went fishing for the loom but couldn't get it out due to the fluffy insulation in my camper voids. Having given up I changed the sensor and luckily this fixed the issue.

Hopefully you have a van without insulation in, or better fishing skills than me. I am not sure what bait attracts wiring looms the best.

Also, in that forum I linked to they talk about not being able to find the relevant wires under the passenger seat. I found them without any issue but don't seem to have made any notes on it that I can find, so I assume it was easy. I remember I ran some twin-core from the plug direct to the sensor to check if that helped, which it didn't, and so I bought the new sensor.

My van is identical to yours except a year older.
 
Last edited:
Thanks for that, now wishing I hadn't mentioned that possibility :D Yes, I have a full camper conversion with units and insulation down that side.

I think it'll be worth trying a new sensor first to eliminate that!
 
Probably off topic but on my old E90 3 series BMW the reluctor ring around the drive shaft rusted which made it expand and chop off the end of the ABS sensor over time.
I was really lucky as the ABS pump and ABS pump ECU also failed in cascade, this was on an 8yr old 90,000 mile car, apparently all of this was par for the course if you were "really lucky"!
 
Found my notes:
- With ignition on but engine not running the voltage at each rear sensor was 11.1 V.
- The existing N/S rear sensor (which wasn't faulty) had an internal resistance of 1.7 M Ohms.
- The O/S rear faulty sensor had an internal resistance of 2.3 K Ohms (note K instead of M).
- The new sensor I purchased measured out at 3 M Ohms.

The wires from both rear sensors run forward and are located in the brown plug under the passenger seat. The rear right sensor cables are a brown and black pair of wires, and the left rear one is a green and black pair. By checking the voltage here, and then at the sensor, and also the resistance of the cable between the connector and the sensor, you should be able to tell pretty easily if the cable is indeed knackered and whether to start swearing or not.
Those are fantastic notes to help people with diagnosis. Very impressive - well done
 
- With ignition on but engine not running the voltage at each rear sensor was 11.1 V.
After doing a bit of diagnosis, I'm getting 10.9V at the connector with the ignition on. Does this rule out a corroded wiring loom?
- The existing N/S rear sensor (which wasn't faulty) had an internal resistance of 1.7 M Ohms.
My sensor is giving a similar reading of 1.72 on the '2M' resistance setting of my multimeter. So does this mean the sensor is good?

With OBDEleven, I've cleared all faults, started the van and no faults prior to moving it and then as soon as I move it the faults are back. Both faults below, mine is a 4motion and interestingly it's throwing a speed sensor error on the AWD module - maybe I have a different issue to the common ones? Haldex pump replaced and oil service done the other week but this fault was present before.
Screenshot_20220609-170558.png

Screenshot_20220609-170550.png
Any ideas where to go from here please?
 
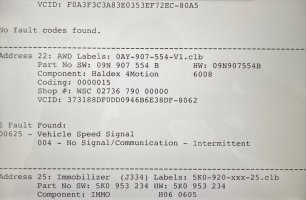
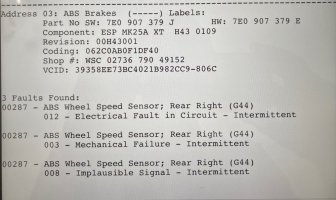
It is a tricky one - your measured voltage, and the resistance of the sensor would suggest they are ok and this isn't the problem. However, the fault codes you are getting are an exact copy of what I did, when it definitely was the sensor to blame:

625 for the vehicle speed signal to the Haldex controller.
thumbnail_IMG_6193.jpg

And 287 for the sensor itself:
thumbnail_IMG_6192.jpg

In your position I would probably still be looking into those sensors but it seems you have done most of what I would. Maybe a couple of other things to try:
- Check the plug and socket contact pins at the sensor carefully - it could be that there is some corrosion right at the end which is only causing an issue when the sensor and loom are plugged together and not when you use your multimeter.
- Did you find and check the plug under the passenger seat? I appreciate the voltage at the rear suggests this isn't a problem compared to mine, but also we may have had different battery voltages and I would probably check what it is at the start of the loom to compare to your reading. A small volt drop between them would be expected, but nothing too substantial.
- Whilst on this bit, measure the resistance of the cable between the passenger seat connector and the sensor connector. Use a long piece of wire and check its resistance end to end first, then you can subtract that from whatever value you get for the whole run. Again, I appreciate this looks unlikely, but worth knowing.
- And finally I would probably lash up a couple of bits of twin-core from that brown connector to the rear abs sensors to completely remove that loom from the system. You could even skip to this step if you wanted. First check if it works with just one bit of twin-core to the rear right sensor from the appropriate pins, and then get a second length running to the rear left sensor and swap the left and right sensors at the brown connector. If the fault shows up as a rear left problem when you move, you know you are onto something with the sensor.

Hope this is of some use to get a bit further along with the problem. It sounds like a bit of a pain.
 
Back
Top