Ecoflow Alternator Charger 800W

40A plus is a big strain on a 12v system.

And for 50 60 70 80 100 amp circuits , very careful design needs to be implemented ia correct gauge cable grounding fuses and fuse holders.
 
40A plus is a big strain on a 12v system.

And for 50 60 70 80 100 amp circuits , very careful design needs to be implemented ia correct gauge cable grounding fuses and fuse holders.
Second this. I have a mental threshold of 30A - below that things are "everyday" and well within scope of good tidy DIY work, decent cable and easy crimp junctions. Above that you really need to think about routing, length, voltage drop and need more specialist heavy duty crimps and tools - if those are one of jobs maybe get the cable made up, find someone here who has the tools as any DIY savings get erased by the cost of the proper tools (and not using the proper tools generates a potential hot spot where you really don't want one)

As to daisy chaining not much to add to the good advice already given. Just make sure it fits your expected use as if you want to empty the power pack and recharge daily then weak point is going to be the items that charge your LB and you're going to be cycling everything much more. Make sure you have robust wiring and fuses on the existing DC-DC and everything is given as much space and opportunity to cool off; it's going to be operating at peak current for a lot longer than it did to date and that may reveal limitations that were fine but become an issue.
 
Just about to take delivery of the Ecoflow 800w Alternator charger. Thinking ahead about the cable route from the engine bay to under the driver's seat (in my case LHD T6.1 Shuttle), I was after your thoughts and opinions.

The charging cable that comes with the charger is a somewhat thick loom (carries both pos + neg 16mm2 cables) that needs to go through the engine firewall via a smallish grommet, under the dash trim and carpet to the underneath of the seat. I will remove the seat base to feed the cable tidily there via the hole in the carpet.

Has anyone routed this loom from the engine bay as described and was it painful to do given the thickness of it?

I was thinking of maybe opting for this alternative:

- Splitting the loom and just send through the positive cable to the engine bay and cut back the negative cable (re-crimp new ring terminal) and ground it to the earthing point below seat.

Does this sound like a more practical alternative? Am I missing anything?

Thanks for your help!
 
Things that make me worry Bluetti might not be on the ball with this in the advertising on this page BLUETTI Charger 1 | 560W Alternator Charger

1. Picture of a consumer unit MCB used as a 12v breaker - a free floating DIN rail mounted breaker in a high current cable with no other protection is a bit... squirmy

View attachment 267644

2. Very clear picture of how NOT to wire to any modern vehicle and instead give it endless starter charging issues by wiring the wrong side of the battery shunt - with a side order of unsupported cables that hold up the terminal protection caps

View attachment 267645


@roadtripper is it best to ditch this MCB that Bluetti supply and replace it with a 60Amp Midi fuse & housing ?
or use them both with the Midi fuse next to the battery, and the supplied MCB next to the Charger 1 ?
 
Just about to take delivery of the Ecoflow 800w Alternator charger. Thinking ahead about the cable route from the engine bay to under the driver's seat (in my case LHD T6.1 Shuttle), I was after your thoughts and opinions.

The charging cable that comes with the charger is a somewhat thick loom (carries both pos + neg 16mm2 cables) that needs to go through the engine firewall via a smallish grommet, under the dash trim and carpet to the underneath of the seat. I will remove the seat base to feed the cable tidily there via the hole in the carpet.

Has anyone routed this loom from the engine bay as described and was it painful to do given the thickness of it?

I was thinking of maybe opting for this alternative:

- Splitting the loom and just send through the positive cable to the engine bay and cut back the negative cable (re-crimp new ring terminal) and ground it to the earthing point below seat.

Does this sound like a more practical alternative? Am I missing anything?

Thanks for your help!
yes you can do that, black cable to chassis and red to starter battery. . . . with fuse on the battery connection. you can cut the cable sorter aswell . .
 
So I just had mine installed In a T6.1 Cali Beach (twin sliding doors) at the same time as solar. The EF AC cable was too thick to route alongside the solar so they routed each down the different sides of the vehicle. I suggested the same thing (only route positive). They said they’d try to avoid that and actually pulled the sliding door step out and ran it behind that. My setup only goes to the leisure under the left seat, so they routed the rest of the journey under the floor. Not sure how you’d make it to starter. Considered connecting to leisure instead? The bi-directional feature is great for it.
 
  • Like
Reactions: CAB
@roadtripper is it best to ditch this MCB that Bluetti supply and replace it with a 60Amp Midi fuse & housing ?
or use them both with the Midi fuse next to the battery, and the supplied MCB next to the Charger 1 ?
Personally I would do one of those, I have a general mistrust of MCB as the only last ditch fault device on high currents in vehicles.

There is a debate about minimising the number of high current connections as well, as those tend to be where you can get heating if not very sound, which would suggest not fitting an MCB or isolator. I'm on the fence with those, if isolating the device is something you will do often (like a leisure battery in a stored van) or it often shorts (I used tiny fuse size breakers on 12v sockets before where the fusebox was hard to reach) then go for it - to my mind a well wired charger isn't either of those cases so I'd more likely just go for a fuse alone.

Yeah @roadtripper that was my thoughts also, the MCB I just wasn't comfortable with.
In the end I binned the supplied MCB and installed the charger under the passenger seat with a 60amp midi fuse next to the battery, and the negative on the factory ground also under the passenger seat, I then put a 100amp Isolator on the seat base so I can manually turn the charger on/off only when I need it.

It works great ! on testing it charged my Bluetti AC70 from 20 - 100% in about 25mins ! so hopefully with a bit of real world testing between the charger and the 200w panel on the roof there might be no need to use the EHU again !
 
I tested the EcoFlow 800w charger when I was travelling back from CRS to Bala last weekend.
It didn’t work because I needed to update the delta 2’s firmware.
So just got around to it.
Bizarrely it needed 3 updates to run the latest firmware which it did separately one at time.
I had never had it hooked up to my house WiFi before.
Anyway after the several updates it now works great.
Seem to be getting the full 800w and the charging was fast.
IMG_7472.pngIMG_7473.png
 
00CFE450-22C6-433D-9A00-B94A3C01CC5B.JPG3D43338E-59E8-421B-AB28-4ACB5B956504.JPG

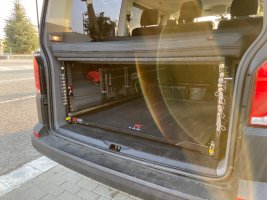
Finally plumbed in my EF Alternator Charger following advice on this thread. I split the loom and sent the positive to the starter battery and the neg cable, I shortened down and grounded to the earth point under the driver seat (LHD in my case). Sending the full loom through the firewall into the engine bay would've been way to fiddly...
I then mounted the charger on an aluminium plate on the frame of my @VAN-KING bed system which keeps all the cables and connectors solidly connected.
Very impressed with the the charger coupled with my Delta 3 Plus.
 
Back
Top