Which Solar Kit? Advice appreciated

zoomequipped

New Member
Hi All,

I'm looking to purchase/install a solar panel kit to my Pop Top roof, and would be very grateful of some advice.

I currently have 2 110A batteries, and use the fridge, microwave (inverter installed also), lights, phone charging, gas heater etc etc.

Want something to keep the batteries running when without EHU at sites, or when parked up near a beach for a few nights!

Can anyone recommend some full kits that would be ideal, and something with good reliability (I hear lots of mixed reviews on Amazon etc with some kits), so something tried and tested by the forum would be ideal.

I'm thinking 150W, not sure if I need single or dual regulator? (I am only wanting to charge the 2 x leisure batteries, and not the actual engine battery)

Also, I've noticed a of installs which take the cables down the back of the pop top and then in through the back of the canvas roof, is there any reason for doing this rather than just drilling a hole in the pop top roof itself, and then taking the cables down via the bed boards/frame etc.?

Another thing i've noticed with lots of semi flexible kits is the option of adhesive or bracket fixings, again is there any advice on this topic? I read a lot about overheating/airflow, but have seen lots of pop tops with flush fitted slim panels, so assuming it isn't a huge issue perhaps?


Thanks in advance, any help/advice would be hugely appreciated.
Simon
 
Hi Simon, appreciate your post being sometime ago, but did you ever get the info you needed? You asked the same questions that i am now asking as i have almost completed my build and my last job is to fit solar panels etc.
 
I had the same dilemma and had been dithering for months then I thought why have a fixed panel which is difficult to fit/replace, will spend most of its life either in the shade or pointing in the wrong direction, holes cut for wires and if I change the van I wave it all goodbye.
So……..last month I bought a Renogy suitcase all in one complete with a built in solar controller. It’s brilliant, it’s plug and play, you can angle it, point in the right direction, stand it on the ground or put it on the bike rack and when not needed zips up in a carry case.
as an aside I put it in the garden to charge up the mower battery so it’s versatile.
just a thought.
Thanks for sharing your experience. One of the main selling points for me of having a fixed solar panel on the roof is that it will charge the vans leisure batteries whilst driving as well as when parked up? Also, i'm thinking if the panel is fixed on the roof, i would have less chance of it being pinched as opposed to a foldaway one? Thanks once again
 
Hello

I ended up buying a 150w semi flexible solar panel from photonic universe, and a Victron 75/15 MPPT controller. Then bought cables and the gland etc for the cables to go through the roof from various places online. Stuck the panel down using Sikaflex, and stuck some corrugated clear plastic roofing sheets to the panel first to help with a flat fitting (the roof has some ridges which are about 1.5cm in depth so I essentially filled the voids between the ridges with the sheets)

Really happy with the outcome, we seem to manage fine for 3 nights with just the two batteries being topped up by the solar, and happy with the install, all neat and tidy and no signs of the panel flying off the van roof whilst doing 70 on the motorway (yet)

regards
 
I’ve put 2 x 100w panels in series on mine last month, charges a 110W AGM battery, not run out of juice once.

use a Victron 75/15 charge controller.
silka flex bonded the panels to the roof, also put the connectors on the van cable so if panels break I can just disconnect them without having to re run cabling to the van, or do any messing about.
In terms of overheating, not had a single issue, make sure you follow the guidance on how to bond the panels properly and leave clear channels for air to escape and not get trapped, there’s a good guide out there which I believe is shared around in the forum. If I find the link I’ll tag it in here.

with regards to van entry for cables, I done mine with the way my pop top manufacturer recommended which is through the canvas.
I believe the main reason for this is that you are drilling a hole not into the “living” area of the roof but outside still in the “wet” area, then you loop it through the canvas leaving a drip loop in the cable, so it eliminates any risk of water ingress into the van.
But of course if you have the naked roof and it’s not carpeted and you are going to be confident your sealing is spot on, then nothing stops you doing that way I suppose.

I’ll post some pictures of mine tomorrow if that helps.
 
This is the thread I was talking about - Solar Technology International

Not sure if you've seen it, but Dellmassive posts a few useful links there. There is also a link to the panels which I used.

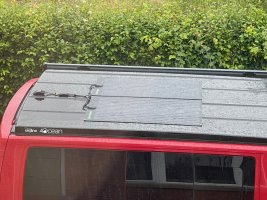
Heres the install of the recent panels in the pictures (sorry couldn't be bothered to get the poptop up in the wet as its raining cats and dogs outside so a picture from upstairs window as I cower from the rain haha.

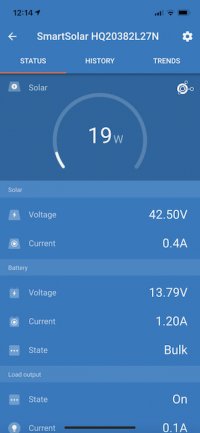
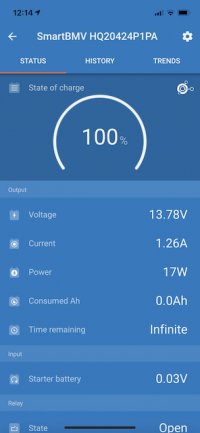
But even with the rain and it being super cloudy i've also taken screenshots of the Victron Solar and Smart monitor (only a fridge is running in the van).

I've got some clips for the cables - but they were crap so need to get some new ones and re-clip them to the roof, whatever you do, do not buy these ones

I've basically ran my own cable from Solar Charge controller to the roof gland and terminated the roof end with solar connectors. Cut the cables that are pre-wired to the solar panels to length for the serial connection and then to the gland cables, re-terminated them. This gives me the ability to swap the panels relatively easy (just the adhesive to scrape off) in event of panels failing/needing replacing etc.

So far super happy with the setup, and as you can see even in the rain, get it keeps up fine with the power usage and run time on battery currently displays infinite, with just the fridge running. This is a second one i've done with solar panels and fingers crossed following the adhesive guides with the pattern not had any overheating issues and it has been used during all of that heatwave we've just had.

This is the duct i used, Offgridtec 006415 Roof Duct Dual Black For Motor Home Caravan Boat Solar Cable Duct ABS : Amazon.co.uk: Business, Industry & Science
And i have literally just stuck it on with the adhesive (after drilling two holes at the back end of the roof for the cables to pass under and then through the Canvas of the tent)


The way I installed this was:
  1. Clean the roof, put the two panels on in location I want them, mask the perimeter of the two panels on the roof so you know where to put them later, and put masking tape pieces on the panels where the high points are of your roof lines
  2. Take the panels off, flip them over on the floor follow the adhesive pattern you sketched out following the guides and noting where the grooves are putting a bit more adhesive into the lower points to make up the gap between panel and roof
  3. Get a second pair of helper hands and lift them onto the roof, lay them flat if doing two panels, then slowly start patting them down but not too hard, just enough to squeeze the adhesive down make sure not to crack the panels at this point. Stick some heavy things on top and leave them overnight.
  4. Remove the masking tape, and make sure your intentionally left gaps in adhesive are still there
  5. Next day just check they have stuck on alright, i can see day light through my adhesive channels for example and they are stuck on solid, just saying as you don't need to go nuts with the adhesive

Hope this helps, as the first one i did was daunting, but like much with any T6 conversion work it's more daunting than the task really is. If you can use some common sense and plan things out you will be alright.

Some stealth purists will probably dislike the way the cables sit on the roof like that, but to me its got its function over form and I feel to me best of both worlds, and thats the great thing about these vans, you get a blank canvas to draw what you wish for you.

I am away in it tomorrow for a few days, if anyone wants any more pictures please let me know.

IMG_4228.jpeg

IMG_4227.jpeg

IMG_4226.jpeg
 
  • Like
Reactions: CAB
Thanks for your post, really useful to read how other folk are tackling the installation of solar panels on their pride & joy vans
 
What solar panels would you recommend for a t6 none pop top.
prob usage. Tv. Fridge. led lights. Water pump. cooker ignition.
Have just fitted ctek d250se with agm 120amp battery.
 
Back
Top