Tarting Up My Door Mirrors With Carbon Fibre

andys

Ex member
VIP Member
T6 Legend
When I made my customised A pillars I initially bought a length of carbon fibre (the actual weave not a wrap) that I intended to cover them with, but as I'd never covered anything like that before and I found it more difficult than I'd thought, I did them in vinyl instead, so I've had this roll of carbon fibre waiting for a purpose in life.

I decided I'd have a go with my door mirrors, covering the tops in carbon fibre and painting the lowers Indium Grey to match the van. I started with basic unpainted ones
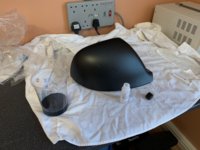
IMG_8242.jpeg
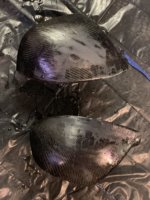
I coated them in epoxy and let it go tacky before placing the cf on them. I did them on separate days so that I could learn from any mistakes the first time and do it better the second. In the end the first one turned out better.
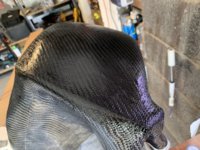
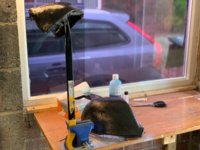
IMG_9500.jpeg
IMG_0409.jpeg
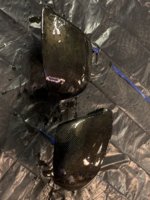
After that, I covered them in another coating of resin and left them to dry for a couple of days.
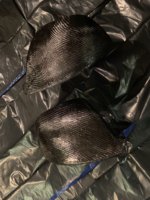
IMG_9952.jpeg
 
Last edited:
The most difficult part I found with this step was how fragile and weak the carbon fibre is when it's pulled and pushed over curves and I've ended up with it being a bit wavy and stretched in a few places. I'm hoping this won't show much when they're finished. Anyway the next step was to pour more resin over them to try and build up a thick glossy coat. This ended up looking fine at the time, but when I came back to look at them when they were dry, there were pits and bubbles where the resin just hadn't taken, despite me cleaning and degreasing them carefully. So I sanded them down with 600 grit to get rid of the high spots and then put tiny amounts of resin into the pits on the tip of a nail. Look a bit of a mess while this went off

IMG_8030.jpeg

Once this was dried it was time for another pour, this time with slow curing epoxy and smoothing over any irregularities as they developed. Looking a lot better now so I need to leave them til the weekend when I'm next free and see how they look then


IMG_9176.jpeg

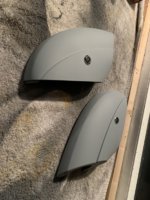
I've also done the lowers in plastic primer, Indium grey and clearcoat and they're now on the van. I tried to take a pic but it's too dark in the garage to tell.
Very pleased with the results considering it's a rattle can job, colour matches well and a nice shiny finish. The only pic I've got is in primer.

IMG_2195.jpeg

Hopefully the next pics I put up at the weekend will be the finished and assembled items on the van.
 
Last edited:
Slight setback with this, I did order the slow curing resin, but I didn't bargain on it still being tacky this morning from Tues night and certainly not ready to be sanded and polished. I suppose the cold weather may have affected the cure time, but the original couple of coats of ordinary resin were rock hard overnight. I've brought them inside in the hope that they'll cure a bit quicker, really wanted to get this job finished tomorrow.
 
So 4.5 days later and it still isn't cured properly! I wish I'd never used this rubbish slow curing epoxy, what's left is going in the bin. I thought gettin the slower curing one would mean fewer blemishes from air bubbles, and that the slightly thinner consistency would be more self levelling - but it's exactly the opposite, it seems to have dried in "waves" and is going to take a fair bit of sanding to get level, and it isn't quite as glossy as the previous type of epoxy I'd used. Where that was rock hard and glossy overnight, this still has a slightly rubbery consistency and you can push a fingerprint into it if you push hard enough.

Wish I'd not bothered and just painted the tops grey as well, but I wanted to do something with that roll of carbon fibre and I always like having a go at something myself if I can. They've been inside since last night so I'll see how they are later in the week.
 
Wish I'd not bothered and just painted the tops grey as well, but I wanted to do something with that roll of carbon fibre and I always like having a go at something myself if I can. They've been inside since last night so I'll see how they are later in the week.

I'm a bit like that, and I like to try new things myself first.

It looks like you did a better job than VW did with their genuine Carbon mirror caps, because they are a terrible fit, and leave parts of the mirror exposed.

Are they puddle lights. or projectors on the lower mirror cap?
 
So 4.5 days later and it still isn't cured properly! I wish I'd never used this rubbish slow curing epoxy, what's left is going in the bin. I thought gettin the slower curing one would mean fewer blemishes from air bubbles, and that the slightly thinner consistency would be more self levelling - but it's exactly the opposite, it seems to have dried in "waves" and is going to take a fair bit of sanding to get level, and it isn't quite as glossy as the previous type of epoxy I'd used. Where that was rock hard and glossy overnight, this still has a slightly rubbery consistency and you can push a fingerprint into it if you push hard enough.

Wish I'd not bothered and just painted the tops grey as well, but I wanted to do something with that roll of carbon fibre and I always like having a go at something myself if I can. They've been inside since last night so I'll see how they are later in the week.

I'm intrigued to find out how these turn out @andys. Labour of love there mate. I would have had a tantrum by now.
 
I'm a bit like that, and I like to try new things myself first.

It looks like you did a better job than VW did with their genuine Carbon mirror caps, because they are a terrible fit, and leave parts of the mirror exposed.

Are they puddle lights. or projectors on the lower mirror cap?
You wouldn't say that if you saw them close up now, they look like they've been trimmed in lizard skin :(

The things in the lower caps are cameras for the 360 system
 
I'm intrigued to find out how these turn out @andys. Labour of love there mate. I would have had a tantrum by now.
Getting close to it. Mainly just annoyed that I'm not able to get them finished today, this was supposed to be van project finishing day and I don't know when I'll have this much free time again.
 
This is ridiculous, 6 days now and they're still tacky! Anyone any experience of this happening with epoxy resin? I followed the instructions exactly, 30ml of hardener to 100ml of resin. What about heating them in the oven? Is there anything I can do to speed it up - or to make it happen at all?
 
I’d just stick them in a very warm place, you don’t really want to be putting them anywhere near where you prepare food ;)
 
What about a UV lamp ? Does anyone you know do gel nails ? Or have a sunbed ? Don't laugh just a thought
 
What about a UV lamp ? Does anyone you know do gel nails ? Or have a sunbed ? Don't laugh just a thought
Ooh there's a thought, I actually do have a UV lamp. Thamks for the suggestion, I'll try anything :thumbsup:
 
It's time to concede failure on this one, I've tried heating, UV, freezing, and swearing at them but after 7 days they're still tacky :( I'll stick them in the utility room and have a look next time I remember, but in the meantime I've got a pair of top covers ordered off ebay for £20 so I can at least use the van. I'll spray them either Indium or Gloss black depending how I feel when they arrive. Shame as it turned out I actually made a half decent job of the carbon fibre and if I'd just bought more of the epoxy I'd already used then they would have turned out pretty good. Lesson learned.
 
Could you not strip the epoxy with a solvent and re apply?
I don't know if any solvent I've got would touch it, but I've put enough time into this and about £20 in materials, £20 for new covers, and another £20-30 for more epoxy and solvent. I could have got a set of cf covers from Vanstyle for £50. Nah, time to move on.
 
Back
Top