Positive Feed Routing

nickvw

New Member
Hi All,

Looking for some advice on routing the positive cable from the main battery to the DC-DC charger and leisure batteries I am fitting in the rear of my T6.1.

The easiest option is that I already have a second battery under the passenger seat, which is factory fitted to power the auxiliary heater. I could use this to power the DC-DC charger and avoid having to run a cable through the engine bulkhead, as this existing battery is already being charged by the smart alternator. Has anyone used this method before ?

If I have to run a cable through the engine bulkhead to the main battery, where is the best place to pass through the bulkhead, without drilling holes ?

Thanks for any advice
If you already have a factory second battery under the passenger seat, why not just use that as your leisure battery instead of installing additional batteries. There will already be a heavy feed from the starter to under the passenger seat. Chances are that it will be a “dumb” split charge relay rather than a smart DC-DC charger, but that can be changed.
The feed cable comes through a rubber grommet in the bulkhead, behind the starter battery. It enters the cabin up behind the glove box on the passenger side.
 
Have done some more thinking and also exploring under the bonnet / dash.

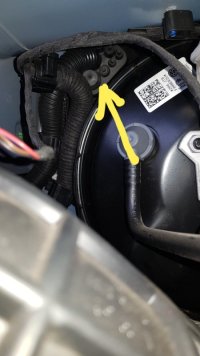
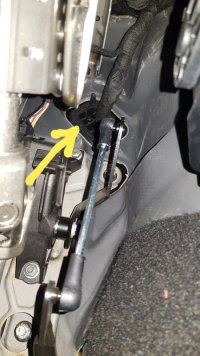
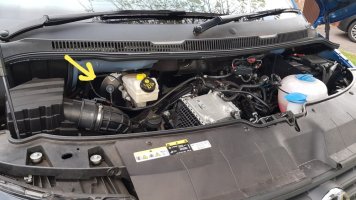
I have found another grommet (see photos), which is on the drivers side, which for me is ideal as that is the side where I want the leisure batteries. It is just next to the brake servo when looking in the engine bay, and in the cab it comes out above the accelerator pedal linkages (but won't touch them). This will allow me to then route through the corner of the dash, then up the A-piller, across the top of the drivers door and to the back. Hope this route might be useful to other people !
The grommet has a number of spare blanked holes in it, so could take several cables if necessary.

Thanks for your thoughts Salty Spuds, but I have decided to steer clear of the existing leisure battery after all. It has obviously been designed by VW to power the auxiliary heater, and i don't know what the effect might be on both the battery and its wiring to apply additional load (probably ok, but not sure). The other big factor is that I use the van off-grid at festivals for up to 5 days without running the engine or charging, so I need plenty of stored power. I have added 2 x 95Ah AGM batteries in the back, which have powered my fridge fine for that period, using a temporary connection (currently have to recharge the batteries on the mains when I get home).
Had a look at the grommet behind the starter battery, but decided to use grommet described above, as I can more easily run the positive cable across the inside of the engine bay instead of the inside of the dash !

Cheers !

20221111_161057.jpg
20221111_160944.jpg
20221111_160812.jpg
 
  • Like
Reactions: CAB
Sounds like you’ve already made up your mind, but I can’t help but think that a lithium battery under the passenger seat & a solar panel would be a much more elegant solution, not to mention a huge weight & space saving.
Good luck.
 
@nickvw Sounds like a massive faff that routing.
Is it not possible to run from the VW feed already under the passenger seat out through the grommet in the floor and then route it under the van and down the drivers side clipped up under the big chassis rail gap and then just bring it in up through the floor?
Much of my cable is routed like that from under the drivers seat and back into the van on the offside to negate the problem caused by my twin slider.
You can cover it in the plastic cable sheathing if you wish too.
 
There is a huge access area behind the panel that hides your suspension top mount (to the left of your yellow arrow in your first picture above), this will allow safe routing behind your scuttle too.

There are 2 grommets passenger side that can be used for access, one in the scuttle and one behind the battery.

Some Californias come with 2 leisure batteries, one front and one rear, it could be worth seeing how they're wired and if the rear is wired from the front leisure. If so then hooking up a DC-DC to the leisure battery to power a 2nd leisure won't be an issue.
 
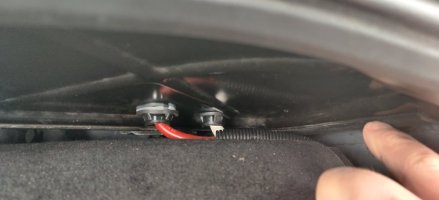
I routed the live to the right of the battery and through the scuttle panel, by drilling a hole and placing a cable gland in to prevent metal cutting the cable.
IMG_20221120_122702.jpg

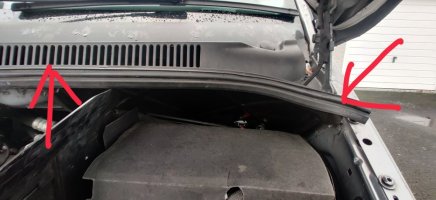
The scuttle panel can be removed to put the holes and glands in. First unscrew the plastic divide between the engine and the battery, at the front, large plastic screw. Then you can detach the scuttle by unscrewing two torq bolts, one just to the left of the battery, through one of the slots in the vented panel below the windscreen. The second is on the right below the bonet attachment to the body.
IMG_20221120_122643__01.jpg
The scuttle panel has a rubber seal below. Behind the scuttle panel is a void. Look towards the back of where the glove box is, from the engine bay, and you will see a large rubber grommet. Pull it out and pierce a hole before pushing the live through it. Then in the cabin, passenger side, pull the rubber seal off the front near side wheel arch and lift the carpet/floor covering. Look under the dash on the left against the outside edge of the metal body work. Under the glove box you will see the cable. Remove the passenger seat and you will see a depression where you can route cables so they are not stood on when the flooring is returned. To lift the flooring, you will have to lift the step plastic tray..
 
Last edited:
Back
Top