LED Fog Light upgrade (Dual colour) - How i Did it -
Following on from @3shotdave original post about "New Led Fog Light Bulbs" i though i would give it a go.
original post: New Led Fog Light Bulbs
original credit: @3shotdave
***************************************************************************************
I liked the idea of the two colour fogs so though i would give it a go.
a quick look over at Autobeam seemed to look genuine and a fairly good quality.
the bulbs in question were:
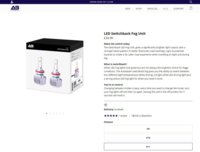
LED Switchback Fog Unit
LED Switchback Fog Unit
£34.90 (+vat +delivery)
Make the switch today
The Switchback LED Fog Unit, gives a significantly brighter light output, with a stronger beam pattern to better illuminate road markings, signs & potential hazards to create a far safer road experience when travelling at night and during fog.
What is switchback?
White LED Fog lights look great but are not always the brightest choice for foggy conditions. The Autobeam switchback fog gives you the ability to switch between two different light temperatures whilst driving, a bright white LED driving light plus a strong yellow LED fog light for when you need it most.
You're in control
Changing between modes is easy, every time you want to change the mode, turn your fog lights off and then on again, leaving the unit in the off position for 5 seconds will reset it.
.
As @3shotdave said it was a case of navigating the site and selecting you poison.
-Shop
-LED
-FOG
-Then pick the model of fog you want, just make sure it is H11 fitting ( VW T6).
So order placed and site back and relax . . . . . . . =]
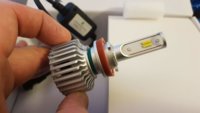
48hrs later the lights arrived, a nice well packaged box containing two smaller boxes, containing the one piece LED lamp, driver and connector.
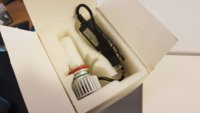
the quality seemed very good.
The lamp unit comes with a solid aluminum heat-sink on the rear with a small functioning cooling fan!
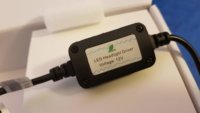
next to that was the small LED DRIVER box, then a short run of cable to the VW OEM connector (sort of, but more on that later)
.
.
fitting the lamps is super easy, its just a case of turning the steering wheel full lock to expose the black plastic fog light cover in the wheel arch liner, and them popping it out with a good beefy trim tool (or a rough old flat blade screw driver in my case, what can i say . . . . its what i had to hand) which relieved the rear of the fog light assembly.
Next was to unclip the existing bulb connector, a VW 2pin spring release connector, a big squeeze on the tab and a sharp pull and it was free.
the existing bulb rotated 90 degrees and it was out.
fitting the new lamps was super simple. . . . . . line up the notches with the cable at the bottom, 90 degree twist and it was locked into place. next was to connect the plug . . . . . but it could go in EITHER way!.
a close look at the LED plug showed a + and - symbol on one side of the connector, so we just matched up the - symbol with the Brown feed wire on the OEM loom plug. . . . . . all good so far. Now for a test.
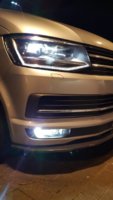
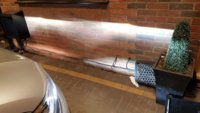
This was the first test:
We have OEM LED headlights, the left FOG (as you see the picture) was the Factory OEM H11 Halogen, the right was the New LED on default WHITE setting. . . . MUCH crisper & brighter very nice =]
.
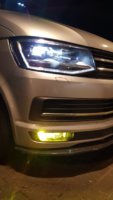
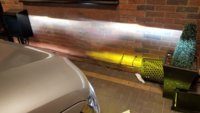
Next was to try the YELLOW, a quick flick of the Fog light switch gave us this, an instant change from bright white to yellow!!! "That the Nuts i thought"
Ok so that workout great, now lets move to the other side. Following the same procedure, wheel on lock, remove rear cover, disconnect loom, twist out old bulb, . . . . refit new LED. We have this.
Both LED Fogs fitted and running on default BRIGHT WHITE.
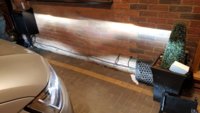
Lovely. . . . . . And then a quick flick of the switch . . . . . and we have YELLOW =] OOOOOsh
.
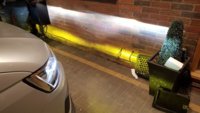
Double awesomeness =]
So how does it work? . . . .well:
**********************************************************************
You're in control
Changing between modes is easy, every time you want to change the mode, turn your fog lights off and then on again, leaving the unit in the off position for 5 seconds will reset it.
*************************************************************************
Tried that and it worked, reset back to nice BRIGHT WHITE, withing about 3 seconds.
We also tried the TURN FUNCTION as the factory H11 lamps dimmed down after being on for cornering while driving.
and yep these were the same, they dimmed down nicely - Superb.
So far very happy.
More info over here > Dellmassive`s -- "how I Done It" -- Thread
.
Following on from @3shotdave original post about "New Led Fog Light Bulbs" i though i would give it a go.
original post: New Led Fog Light Bulbs
original credit: @3shotdave
***************************************************************************************
I liked the idea of the two colour fogs so though i would give it a go.
a quick look over at Autobeam seemed to look genuine and a fairly good quality.
the bulbs in question were:
LED Switchback Fog Unit
LED Switchback Fog Unit
£34.90 (+vat +delivery)
Make the switch today
The Switchback LED Fog Unit, gives a significantly brighter light output, with a stronger beam pattern to better illuminate road markings, signs & potential hazards to create a far safer road experience when travelling at night and during fog.
What is switchback?
White LED Fog lights look great but are not always the brightest choice for foggy conditions. The Autobeam switchback fog gives you the ability to switch between two different light temperatures whilst driving, a bright white LED driving light plus a strong yellow LED fog light for when you need it most.
You're in control
Changing between modes is easy, every time you want to change the mode, turn your fog lights off and then on again, leaving the unit in the off position for 5 seconds will reset it.

.
As @3shotdave said it was a case of navigating the site and selecting you poison.
-Shop
-LED
-FOG
-Then pick the model of fog you want, just make sure it is H11 fitting ( VW T6).
So order placed and site back and relax . . . . . . . =]
48hrs later the lights arrived, a nice well packaged box containing two smaller boxes, containing the one piece LED lamp, driver and connector.

the quality seemed very good.
The lamp unit comes with a solid aluminum heat-sink on the rear with a small functioning cooling fan!
next to that was the small LED DRIVER box, then a short run of cable to the VW OEM connector (sort of, but more on that later)

.

.
fitting the lamps is super easy, its just a case of turning the steering wheel full lock to expose the black plastic fog light cover in the wheel arch liner, and them popping it out with a good beefy trim tool (or a rough old flat blade screw driver in my case, what can i say . . . . its what i had to hand) which relieved the rear of the fog light assembly.
Next was to unclip the existing bulb connector, a VW 2pin spring release connector, a big squeeze on the tab and a sharp pull and it was free.
the existing bulb rotated 90 degrees and it was out.
fitting the new lamps was super simple. . . . . . line up the notches with the cable at the bottom, 90 degree twist and it was locked into place. next was to connect the plug . . . . . but it could go in EITHER way!.
a close look at the LED plug showed a + and - symbol on one side of the connector, so we just matched up the - symbol with the Brown feed wire on the OEM loom plug. . . . . . all good so far. Now for a test.
This was the first test:
We have OEM LED headlights, the left FOG (as you see the picture) was the Factory OEM H11 Halogen, the right was the New LED on default WHITE setting. . . . MUCH crisper & brighter very nice =]

.
Next was to try the YELLOW, a quick flick of the Fog light switch gave us this, an instant change from bright white to yellow!!! "That the Nuts i thought"

Ok so that workout great, now lets move to the other side. Following the same procedure, wheel on lock, remove rear cover, disconnect loom, twist out old bulb, . . . . refit new LED. We have this.
Both LED Fogs fitted and running on default BRIGHT WHITE.

Lovely. . . . . . And then a quick flick of the switch . . . . . and we have YELLOW =] OOOOOsh
.

Double awesomeness =]
So how does it work? . . . .well:
**********************************************************************
You're in control
Changing between modes is easy, every time you want to change the mode, turn your fog lights off and then on again, leaving the unit in the off position for 5 seconds will reset it.
*************************************************************************
Tried that and it worked, reset back to nice BRIGHT WHITE, withing about 3 seconds.
We also tried the TURN FUNCTION as the factory H11 lamps dimmed down after being on for cornering while driving.
and yep these were the same, they dimmed down nicely - Superb.
So far very happy.
More info over here > Dellmassive`s -- "how I Done It" -- Thread
.
Last edited:

