First a big shout out to Steve @CRS Performance for his advice in seeking the right set up for my needs. He's a nice guy and I suspect what he doesn't know about tuning suspension isn't worth knowing. I wanted a lift and more comfort so he provided me with a set of KONI Sport Damping Adjustable Shocks tuned for my set up, to go on my T30 (with T32 Springs) Caravelle and a lift kit made by PCD who are a UK based engineering firm. I'm always happy to buy British!
Here goes anyway...
Tools used:
8mm, 18mm, 19mm, 21mm Sockets, 32 mm (12 sided) sockets and a wrench
Torque Wrench (up to 0 180 Nm)
M14 Spline Key
Various Alan Keys
Electric screwdriver
3 Ton Trolley Jack
3 Ton Axle Stand
I started with the Rear Shocks as I thought they looked a bit easier. They were! Here is the process I followed. Hopefully it'll be of use to somebody. Fronts shocks will follow.
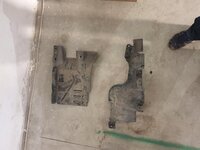
I removed the forward and rearmost part of the plastic undertrays down either side to make access to the Jacking points and axle stand points a bit easier. Its half a dozen 8mm bolts for each.
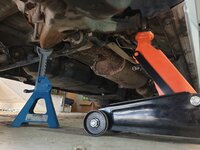
Then, loosen the wheel bolts slightly with a 19mm socket and jack it up. Support the van with an axle stand under the forward bushes of the swing arm. I positioned it like so:
Using a 21mm spanner and a long socket wrench (or strong arms) undo the bolt at the bottom of the shock.
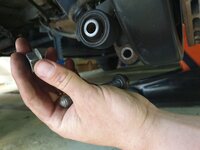
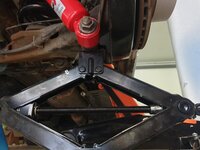
To make it easier to refit on the next side I put am emergency jack under the wheel hub. This made the bolt go back much easier!
When done remove the 19mm bolt at the top of the shock. Access to this is easy.
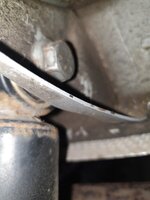
There is no need to remove the plastic wheel arch liner although I did on the first one. It gave me no advantage over not doing it and I didn’t remove it on the second rear wheel arch.
I also found that removing the ARB where it connects to the swing arm on both sides made it much easier to push the swing arm down in order to release the spring. I did not get a photo of this unfortunately but if you look at either end of the ARB you’ll see two bolts holding it on. It is easy to reattach when the wheels are re-fitted and the weight of the van is back on the tyres. Be careful though as I popped one of the bolts by tightening it up to 60Nm as recommended, consequently the second one popped over night. They’ve been extracted and replaced.
Next, push the lower arm down and the spring will come out easily.
Put the top mount spacer on top of the spring. In this case I’ve swapped out my -20mm Caravelle springs for regular length T32 springs.
Refit the spring. It should go in fairly easily so if it isn’t reassess what you’re doing and try again.
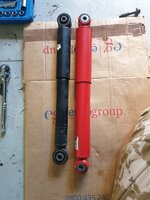
Here is a shot of the OEM shock versus the KONI. It’s about an inch longer at full stretch and considerably wider.
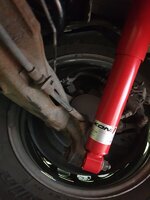
Position the shock and attach the top bolt, I loosely fitted it to give me a bit of wiggle room for positioning the bottom bushing. Re-attach the bottom bolt through the bushing on the new shock. Tighten up to 120Nm. Then go tighten the top bolt to 80Nm. Attach the wheels. Replace Jack, pump, remove axle stand, lower jack.
Repeat on the other side.
Here goes anyway...
Tools used:
8mm, 18mm, 19mm, 21mm Sockets, 32 mm (12 sided) sockets and a wrench
Torque Wrench (up to 0 180 Nm)
M14 Spline Key
Various Alan Keys
Electric screwdriver
3 Ton Trolley Jack
3 Ton Axle Stand
I started with the Rear Shocks as I thought they looked a bit easier. They were! Here is the process I followed. Hopefully it'll be of use to somebody. Fronts shocks will follow.
I removed the forward and rearmost part of the plastic undertrays down either side to make access to the Jacking points and axle stand points a bit easier. Its half a dozen 8mm bolts for each.

Then, loosen the wheel bolts slightly with a 19mm socket and jack it up. Support the van with an axle stand under the forward bushes of the swing arm. I positioned it like so:

Using a 21mm spanner and a long socket wrench (or strong arms) undo the bolt at the bottom of the shock.

To make it easier to refit on the next side I put am emergency jack under the wheel hub. This made the bolt go back much easier!

When done remove the 19mm bolt at the top of the shock. Access to this is easy.

There is no need to remove the plastic wheel arch liner although I did on the first one. It gave me no advantage over not doing it and I didn’t remove it on the second rear wheel arch.
I also found that removing the ARB where it connects to the swing arm on both sides made it much easier to push the swing arm down in order to release the spring. I did not get a photo of this unfortunately but if you look at either end of the ARB you’ll see two bolts holding it on. It is easy to reattach when the wheels are re-fitted and the weight of the van is back on the tyres. Be careful though as I popped one of the bolts by tightening it up to 60Nm as recommended, consequently the second one popped over night. They’ve been extracted and replaced.
Next, push the lower arm down and the spring will come out easily.
Put the top mount spacer on top of the spring. In this case I’ve swapped out my -20mm Caravelle springs for regular length T32 springs.
Refit the spring. It should go in fairly easily so if it isn’t reassess what you’re doing and try again.
Here is a shot of the OEM shock versus the KONI. It’s about an inch longer at full stretch and considerably wider.

Position the shock and attach the top bolt, I loosely fitted it to give me a bit of wiggle room for positioning the bottom bushing. Re-attach the bottom bolt through the bushing on the new shock. Tighten up to 120Nm. Then go tighten the top bolt to 80Nm. Attach the wheels. Replace Jack, pump, remove axle stand, lower jack.
Repeat on the other side.

Last edited:
