You are using an out of date browser. It may not display this or other websites correctly.
You should upgrade or use an alternative browser.
You should upgrade or use an alternative browser.
Frankenstein! T5.1 to T5 facelift
- Thread starter tommo
- Start date
There is a time limit to modify post for members.i have an question for the admins, why i can't modify my old post?
i want to correct the old images address, but the forum don't permit me
If you upgrade to VIP membership you can modify your post at anytime.
You also get a heap of other features and access to VIP area which has PDF’s of wiring looms fuse boxes etc etc.
You’re also allowed to post items for sale and it helps to support the running costs of this site.
You also get a nice gold banner under your name which is worth the money on its own.

I’ll come back and modify this post at anytime if I think of something else.

.... what a super job ... you have to be young to do all this !!!
i'm on earth since 1977!

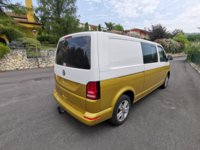
Amazing!and this is the final result!
View attachment 48479
View attachment 48480
i'm really proud of my work and my van! i love it!
next exterior upgrade, new t6 folding mirrors in white color,
interiore lining, and sound and heat shield
Can you see the interior shots then? I can only see the first few images in post #1 and none in post #2...Hey Tommo, what's the grey thing on the roof ?
Great photos of all of the work. You can see whey @AbsoluteT5 and the pros insulate the rear arches from the outside now.
..sod it, have I forgotten to pay the bill, again?
and this is the final result!
View attachment 48479
View attachment 48480
i'm really proud of my work and my van! i love it!
next exterior upgrade, new t6 folding mirrors in white color,
interiore lining, and sound and heat shield
Brilliant work on your transformation. It looks absolutely spot on.
Can you see the interior shots then? I can only see the first few images in post #1 and none in post #2...
..sod it, have I forgotten to pay the bill, again?
Brilliant work on your transformation. It looks absolutely spot on.
Not the interior, no. The external under-arch shots just struck me how much space there is there when the liners are removed, and how easy it is to get to, to clad in Dynamat or similar. I'd seen a comment in another thread that some of the professionals soundproof the rear tubs from the outside, to preserve the profile from the inside. Just an observation ....

Can you see the interior shots then? I can only see the first few images in post #1 and none in post #2...
..sod it, have I forgotten to pay the bill, again?
no, you paid the bill correctly
in the future i'll become a vippppppppppps and i'll edit and correct the old posts.
Hey Tommo, what's the grey thing on the roof ?
Great photos of all of the work. You can see whey @AbsoluteT5 and the pros insulate the rear arches from the outside now.
is an original wv air duct with fan, on the dash are present two switches for in or out air direction.
Today i'll do some photos about this particular
Not the interior, no. The external under-arch shots just struck me how much space there is there when the liners are removed, and how easy it is to get to, to clad in Dynamat or similar. I'd seen a comment in another thread that some of the professionals soundproof the rear tubs from the outside, to preserve the profile from the inside. Just an observation ....
when I saw the free space under the liner I thought that it could be used to soundproof the arches from the outside, but I didn't have time to do it, the coachbuilder wanted me and my van out of his shop as soon as possible

asap i'll put my van on a lifter, and i'll restore all the underchassis from rusty, in those moment i'll soundproofing the rear arches.
a little upgrade,
after five months of continuous use, now i stop the van to some repairs.
When i bought the van, there was a gearbox trouble, the sixth gear didn't work, anyway i used the van without problems.
Now it's time to fix it!
I take advantage of it for changing oil pump, oil pump belt, the connecting rod bushings, timing belt and water pump.
The engine run really well, but after 350.000km i think is a good idea change this parts.
So yesterday I started to disassemble the front
bumper, headlight, front grille,lock carrier and intercooler was dismantled
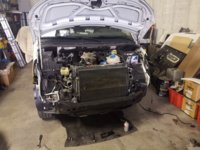
now it's the turn of the radiators and the bumper frame
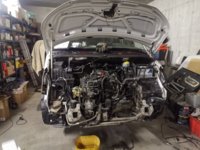
and then engine wiring
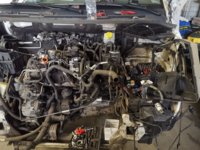
now it's the turn of the axles
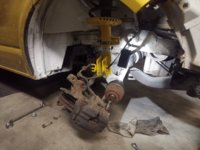
timing belt cover and engine mount
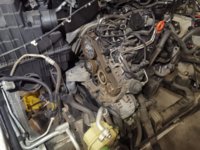
and finally, engine and gearbox are out of the van
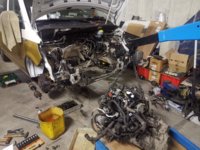
it was harder than I thought, in total i took 6 hours to dismantle everything.
after five months of continuous use, now i stop the van to some repairs.
When i bought the van, there was a gearbox trouble, the sixth gear didn't work, anyway i used the van without problems.
Now it's time to fix it!
I take advantage of it for changing oil pump, oil pump belt, the connecting rod bushings, timing belt and water pump.
The engine run really well, but after 350.000km i think is a good idea change this parts.
So yesterday I started to disassemble the front
bumper, headlight, front grille,lock carrier and intercooler was dismantled

now it's the turn of the radiators and the bumper frame

and then engine wiring

now it's the turn of the axles

timing belt cover and engine mount

and finally, engine and gearbox are out of the van

it was harder than I thought, in total i took 6 hours to dismantle everything.
Due to Covid-19 one month ago, i stopped the works, but i have some photo and upgrade to show you!
after disassemble engine and gearbox, I started to open the engine.
first oil pan!
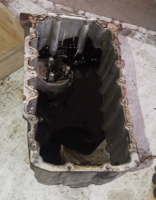
not bad after 350.000km (about 217500 miles), only old oil, no dirt ( i found only strange plastic particles yellow colored in the oil pump strainer)
after a good clean she's back as new
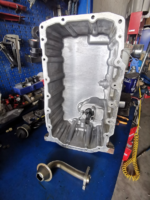
lovelly!!!
now it's oil pump turn!
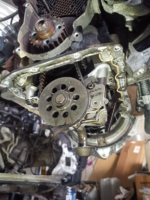
even the oil pump was in good conditions, as pistons, conrods, turbocharger, fuel pump and injectors.
as you see the bushings was in very good conditions despite the miles traveled
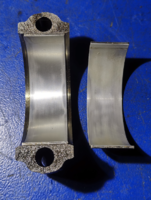
only the oil pump belt was in worst conditions, ready to yield
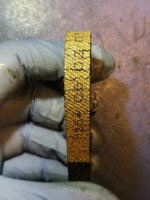
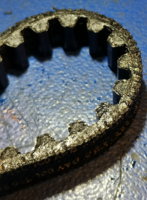
all the black lines you see are cracks, and i found out what the pieces found in the oil pump strainer were
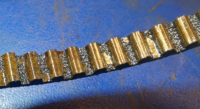
the belt was crumbling
after disassemble engine and gearbox, I started to open the engine.
first oil pan!

not bad after 350.000km (about 217500 miles), only old oil, no dirt ( i found only strange plastic particles yellow colored in the oil pump strainer)
after a good clean she's back as new

lovelly!!!
now it's oil pump turn!

even the oil pump was in good conditions, as pistons, conrods, turbocharger, fuel pump and injectors.
as you see the bushings was in very good conditions despite the miles traveled

only the oil pump belt was in worst conditions, ready to yield


all the black lines you see are cracks, and i found out what the pieces found in the oil pump strainer were

the belt was crumbling
PLEASE PAY ATTENTION!
about the oil pump belt nothing is written in the user manual as a replacement interval,
the same thing on the workshop manual and on the etka website...
i asked for at the volkswagen reseller, and at the italian importer,
and the reply is the same "the oil pump belt shouldn't be replaced"
now, seeing what I discovered, I did a search and found that several engines at about 400,000 km (about 250000 miles) melt due to the belt breaking
if I hadn't opened the engine,I wouldn't have noticed and in a short time the engine would have broken.
the entire amount (parts and works) is not too much expensive compared to a new engine costs.
the parts we need to do the works is:
oil pump belt : 03L 115 264 A
oil pump : 03L 115 105 B
crankshaft oil seal : 038 103 085 E
crankshaft bolt : WHT 005 322
The oil pump replacement isn't mandatory, but I recommend it, I also recommend changing the distribution kit ( to do the work, distribution and oil pan must be removed)
these parts and this problem plague the engines 2.0 TDI from 2009 to 2015 (CAA,CAAA,CAAB,CAAC) but i think also the next series from 2015 to today (CXG CXGA CXGB) because they are constructively similar.
i really hope this post can help someone.
hi guys, some months agò i sold my van... and now i bought another one (used, i'm poor  )
)
but the story don't change, i'll start to do some improvement and retrofit..
conversion from business to highline dashboard, automatic climatisation, led headlight, front and rear pdc, electric foldable mirrors
so now i ask to admins.... can i start a new post or i must continue in this one?
 )
)but the story don't change, i'll start to do some improvement and retrofit..

conversion from business to highline dashboard, automatic climatisation, led headlight, front and rear pdc, electric foldable mirrors
so now i ask to admins.... can i start a new post or i must continue in this one?


