Driver’s door adjustment?

T6ARF

Matt
VIP Member
T6 Legend
Hello folks,

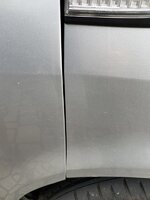
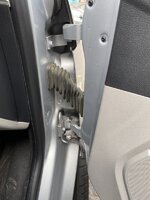
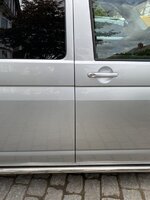
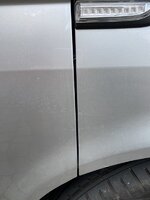
I’ve just noticed this morning that my driver’s side door appears to have ‘dropped’ a little and is pinching the bodywork and rubbing off the paint! Please see pictures below....

B2B2B649-EEFE-49C8-BEA9-253CB8DF3A99.jpeg
62D9A86E-95C2-4F27-A458-6C2543363CC3.jpeg
The question is does anybody know if the door can be adjusted to lift it up at the bottom slightly?

As always, any help would be much appreciated :thumbsup:

Cheers, Matt
 
I forget to say.... the first picture is with the door closed and the second picture is with the door opening and pinching together.... hope that makes sense? :thumbsup:
 
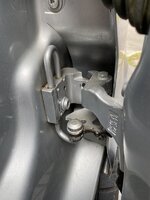
got a pic of the hinges on the inside . . . .
 
In the bottom picture you can see the panels are just slightly off?
 
Adjusting door hinges

---


Vehicle must be standing on its wheels to enable front door to
be adjusted.
♦ To ensure correct door adjustment, the door hinge on the Apillar must be loosened. Other measures, such as raising the
door, will prove pointless. Pressure from above will cause the
door to drop again.
♦ The front door is adjusted correctly if the gaps/shut lines are
even all around, the door is not too deep or does not stand
proud and all contours align when the is door closed.
♦ Checking gaps/shut lines ⇒ Body Repairs; Rep. gr. 00 ; Panel
gaps/shut lines; Body - front
♦ If there is a requirement to loosen the door hinge on the Apillar from the interior, an M8 multi-point socket from the tool
set - V.A.G 1816/2- can be used.
♦ The hinge bolts must always be renewed if loosened.
♦ After completing installation or adjustment, corrosion protec‐
tion measures must be carried out on hinge and bolts.


---


Correct adjustment to achieve a flush fitting is carried out via the
bolts on the door hinge.
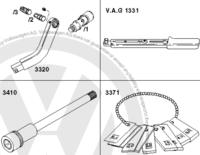
Use special door alignment tool - 3320- with bit - 3320/3- .
Top door hinges:
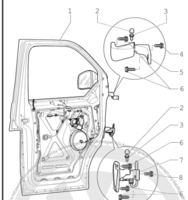
– To adjust upper section of door -1- at hinges -5-, loosen bolts
-4- and -6-.
– To access bolt -4-, remove dash panel insert ⇒ Electrical sys‐
tem; Rep. gr. 90 ; Dash panel insert; Removing and installing
dash panel insert -KX2- .
– ⇒ General body repairs, interior; Rep. gr. 70 ; Central tube
for dash panel; Removing and installing central tube for dash
panel
Bottom door hinges:
– To adjust door -1- in lower area at hinges -7- loosen bolts -6-
and -8-.
– To access bolt -8-, remove dash panel trim on left ⇒ General
body repairs, interior; Rep. gr. 70 ; Dash panel; Removing and
installing dash panel end cover .
– Remove bonnet lock release lever

---


1599391448159.png


---


1599391552887.png

-----
 
Adjusting door hinges

---


Vehicle must be standing on its wheels to enable front door to
be adjusted.
♦ To ensure correct door adjustment, the door hinge on the Apillar must be loosened. Other measures, such as raising the
door, will prove pointless. Pressure from above will cause the
door to drop again.
♦ The front door is adjusted correctly if the gaps/shut lines are
even all around, the door is not too deep or does not stand
proud and all contours align when the is door closed.
♦ Checking gaps/shut lines ⇒ Body Repairs; Rep. gr. 00 ; Panel
gaps/shut lines; Body - front
♦ If there is a requirement to loosen the door hinge on the Apillar from the interior, an M8 multi-point socket from the tool
set - V.A.G 1816/2- can be used.
♦ The hinge bolts must always be renewed if loosened.
♦ After completing installation or adjustment, corrosion protec‐
tion measures must be carried out on hinge and bolts.


---


Correct adjustment to achieve a flush fitting is carried out via the
bolts on the door hinge.
Use special door alignment tool - 3320- with bit - 3320/3- .
Top door hinges:
– To adjust upper section of door -1- at hinges -5-, loosen bolts
-4- and -6-.
– To access bolt -4-, remove dash panel insert ⇒ Electrical sys‐
tem; Rep. gr. 90 ; Dash panel insert; Removing and installing
dash panel insert -KX2- .
– ⇒ General body repairs, interior; Rep. gr. 70 ; Central tube
for dash panel; Removing and installing central tube for dash
panel
Bottom door hinges:
– To adjust door -1- in lower area at hinges -7- loosen bolts -6-
and -8-.
– To access bolt -8-, remove dash panel trim on left ⇒ General
body repairs, interior; Rep. gr. 70 ; Dash panel; Removing and
installing dash panel end cover .
– Remove bonnet lock release lever

---


View attachment 84139


---


View attachment 84141

-----
@Dellmassive any idea where I would get this VAG 3320 tool or similar from? I’ve already got a spline bit set (M10 is the size I need), but the bits are too long to get in with.... bits need to be about 25mm max :confused:
 
How did you get on sorting this? Mine is doing the same.
Dave I loosened the fixings that go into the door (from the hinge) and put in a washer to correct the spacing and lift the door from the bottom. You might need a second pair of hands to help hold the heavy door.
 
Dave I loosened the fixings that go into the door (from the hinge) and put in a washer to correct the spacing and lift the door from the bottom. You might need a second pair of hands to help hold the heavy
I’ll give that a go then, thanks for the reply :thumbsup:
 
Back
Top