Sparky’s Guide to leak- free, concealed, colour- coded awning rails with Thule bars on top!
So….we have had the van (2017 T32 LWB 204 DSG Kombi) for almost a year now and I have been obsessed with the idea of fitting a leak- free awning rail under the roof bars. I wanted a sunshade and rainshelter option for day trips with no obvious visible fittings with a small pack size for the awning within the van. I have been reading all the T6 Forum posts regarding leak- free roof bar and awning rail fitting and synthesised my own formula! Some FANTASTIC knowledge available here, so thanks to all who came before me. Standing on the shoulders of giants and all that (and I am only 5’5” after all LOL!).
Anyway, with things calmer at work and at home I finally got round to biting the rubber bullet! (N.I. humour) My son is now 7 months old so a little more time in the day…
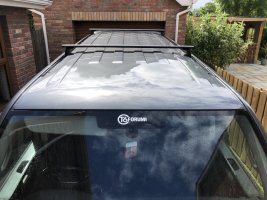
I fitted the Thule Wingbars months ago using just the factory rubber washers and a dab of silicone before inserting the bolts. I chose the Thule bars rather than rails with cross bars because I often transport my 15’ open canoe and need to be sure of the load- bearing capacity. They don’t look as slick as the rails and crossbars in my opinion but needs must so bar position was a combination of what I thought looked cool and suitable position to support the boat. The bars are positioned at #2 and #5 looking from the front of the van and have been great so far with no leaks and the boat sitting perfectly with the bow just over the front windscreen a few cm off the roof and a slight overhang at the rear which is fine.
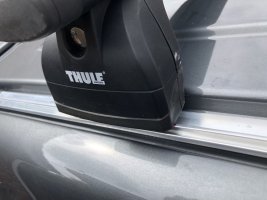
I decided to use the Thule 753 rather than 751 feet as they are lower profile which probably isn’t as practical but for me looks a bit better! NOTE: it is definitely a jiggly- squeeze to get the locking covers on with the 753 feet but it can be done with a bit of fettling. I was hoping this process would actually be easier with a few mm of awning rail and rubber washer beneath…I bought replacement 45mm stainless hex socket bolts for the roof bar feet to roof connection instead of the stock 40mm due to the added height beneath the feet.
Anyway, onto awning rail choice. Having fitted black load- rated alloys, debadged the rear, rebadged the VW logos gloss black, replaced the chrome grill strip with gloss black and fitted a travelinlite gloss black splitter I wanted to keep the black accents if possible. Gloss black trapezoid side bars may follow…ssssh! Keder rails have a fairly reasonably costing black powder coated awning rail on Amazon but they could not ship to Northern Ireland so I went for the Funky Leisure rails. I say rails because it always bothered me that one side of the bars would be slightly higher than the other so the low cost of the Funky Leisure rails enabled me to buy one for each side for the price of one basically. Aesthetically I think the Camper Essentials rail is the best looking and they essentially(!) can provide what I have done as regards roof bar feet cutouts but I reckoned the Funky Leisure rails were even more inconspicuous. They are also a third of the price and have a wider flat section to the roof than the Keder brand rails on Amazon. I bought them 2.8m long undrilled and uncut because I had plans to put bevelled awning entries and foot bar feet cut outs etc on them similar to the Camper Essential product.
As regards colour, I contacted a local powder- coater and understandably the minimum cost was £100+ vat due to setup etc so I decided to go for the DIY paint approach. The Funky Leisure rails come in the natural aluminium colour so once again, “good” paints not being shipped to Northern Ireland from Amazon, I went down to Halfords and bought their slightly more expensive acid etch primer, gloss black paint and lacquer with plans to paint after cutting and drilling.
Concerns before fitting were the 2mm gap between rail and roof under the roof bar feet due to the rubber (neoprene) washers- would the roof bar feet be secure when not neatly flush on their base and rear with the roof? Only fitting would tell but I was hopeful!
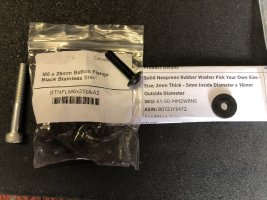
I acquired the parts as follows:
On to the fitting!
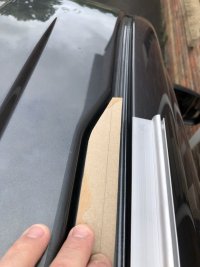
The first task was to remove the roof bars and roof blanking bolts, set the awning rails on and check inboard/ outboard/ fore/ aft position, cut the front angle, drill the 5 holes and dry fit. I decided to cut the front of the rail to match the angle on the front of the gutter similar to the Camper Essentials rails purely because they look good.
Once this angle was cut using a cardboard template to match the gutter angle, I then laid the rails on the roof and decided on fore/ aft position with the rails 100mm from the tailgate at the rear because they are low in the gutter and this would enable easy sliding in of the awning at either end without being blocked by the higher tailgate top and also the end of the rail matched the end of the roof’s raised sections so looked tidy. I filed the rear corner edge of the aluminium rail for tidiness and to avoid snagging/ tearing of the awning. Over the whole process I found hand files to be more controllable and accurate than the power file.
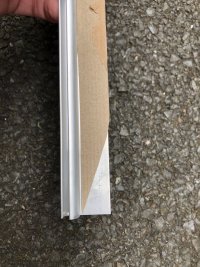
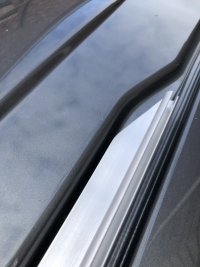
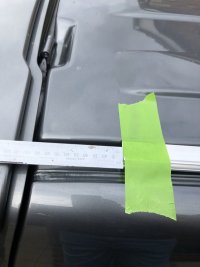
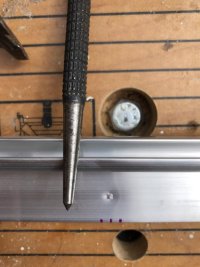
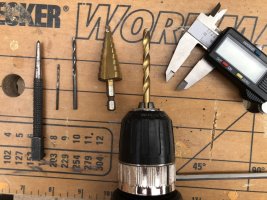
After that I decided how far outboard of the roof gutter edge dip I wanted the awning insertion section (I decided to have the flat of the rail neatly matching the flat part of the upper gutter with the bolt holes in the middle of the 20mm wide flat awning rail section), marked up bolt positions, centre- punched then drilled with a series of bits to keep the holes neat and centred. I kept the holes 6mm to give least potential for water ingress. Then I dry- fitted the rails to make sure the holes lined up with bolt positions, they fitted perfectly and I learned that the captive nuts in the roof actually allow for a little movement so all good there!
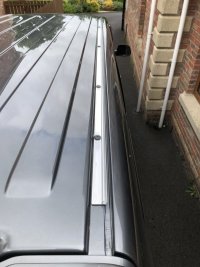
With the rails loosely fitted, I set the roof bars on top in position and marked where the roof bar feet cut outs would be. I added 10mm either side of the cutouts to give room to slide the awning around the feet.
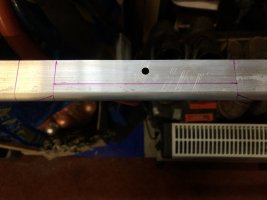
I then marked angled awning entry cuts for the front and end of each rail along with before and after each roof bar foot. I made the slope with a 30mm bottom edge which seemed about right. These are probably unnecessary but I thought they would look good and also prevent awning snagging.
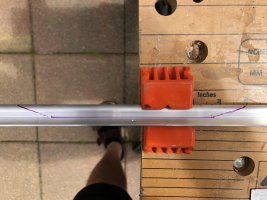
As regards cutting the aluminium, my oscillating saw with a brand new blade didn’t seem to be great on the aluminium so I went for the grinder with a cutting disc. WARNING: after making all the cuts I was doing research and apparently it’s a really bad idea to use the grinder on aluminium (although you can get an aluminium specific disc which I did not have) as the aluminium is so soft the blade can get bogged down, throw the piece of work back in your face etc. plus it is ESSENTIAL to wear a mask and goggles as the small pieces of aluminium dust and possibly gas are extremely harmful to your lungs. USE A GRINDER ON ALUMINIUM AT YOUR OWN RISK!!!! Anyway, after my first cut bogged a bit I was super careful, used very light pressure and it turned out fine. Too lazy to hacksaw!
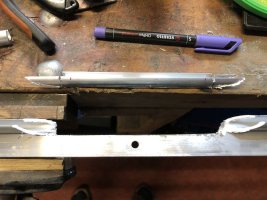
Cutting was quick and relatively easy if scary at times (once again I can’t recommend using a grinder to cut aluminium) but the most time- consuming process was filing and sanding the aluminium to get an acceptable finish. I used a power file for the non- delicate work and finished with hand files then sandpaper for final shaping. Randomly, a crooked knife for canoe paddle shaping turned out to be super useful for removing aluminium burrs, I found the soft aluminium almost wood- softness to work with….treat it lightly and with care!
NOTE: be careful when you remove the C- section leaving only the flat section because the aluminium has the potential to be floppy without the structure the C- section provides. It is fine when bolted but not when carrying it around!!!
When all holes and cuts had been made and sanded smooth I gave the entire rails a rub down with scotchbrite in preparation for painting.
After that I bodged some hangers for the rails from the clothesline using two levels of cut up wire coat hangers and found that they let me paint without any significant missed patches. After a rub down with electrical contact cleaner I gave the rails 3 good coats of acid etch primer. I paid close attention to the inner C- sections to make sure they had a complete coat of paint and they were straightforward enough to access with a close up but fast pass with the spray can. After that I gave the whole lot a very light rub down and cleaned off with solvent ready for the next layer.
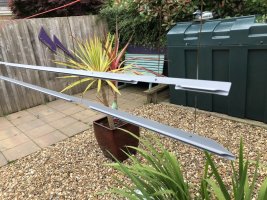
I used 3 layers of Halfords gloss black for the next coat, sanding lightly with scotchbrite after the first but not between the next two.
Then 3 layers of clear lacquer and Bob’s your uncle! Lovely glossy finish, not paint shop perfect but no noticeable flaws unless really looking hard.
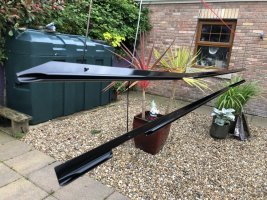
After that I dry- fitted the rails to test how securely the roof bar feet sat. I had considered using a 19mm wide 3mm thick butyl layer between the tail and roof but after the dry fit decided not to because as I read in another post on here, the gap gives room for water to drain away and not pool and the rails were totally solid with minimal flex even at the ends despite the roof bar feet cutouts, if fact the floppiness of the aluminium after the front cutout totally disappeared when the roof bar foot is securely bolted down.
For the final fit I used a dab of clear waterproof silicone (splurged on a new tub LOL) in all the 10 bolt holes for a “belt and braces” leak- prevention approach and then washers, rails, upper washers, feet, bars and bolts! Job done!
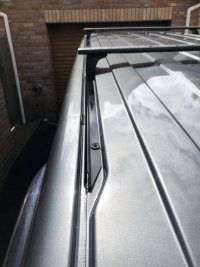
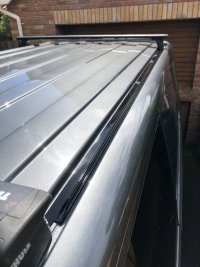
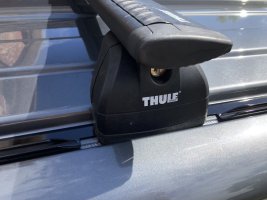
I’m really happy with the end result. The awning slides smoothly into the bevelled ends and is easy to manoeuvre round the roof bar feet. It does take a few more seconds than with an uncut rail but isn’t much of a hassle.
I know the rails are totally invisible anyway apart from to those in HGVs but it makes me happy knowing that not only can we throw up a sun or rain shade in minutes but that the rails are black and shiny up there in their wee grooves!!! After fitting I admit I thought for a second “why did I even bother painting them?” but in hindsight painting also conceals any unwanted imperfect sanding marks!
The big question….. if I was doing it all over again what would I change….?
Well, if I had unlimited cash or no tools or skills or “the fear”, I would get camper essentials to make their rail custom cut for my roof bars because their rail shape is so beautiful but that would cost SIGNIFICANTLY more…. About 3 times the price whether I went for one side or both.
Ideally I’d have them powder coated instead of painted but once again this would add at least £100 on the cost unless I was already having e.g. wheels powder coated at the time.
I might consider using a few strips of bicycle inner tube cut to size under the rail beneath the roof bar feet if I did it again as when you bolt the foot down it takes the rail almost to the roof as expected but this doesn’t seem to have distorted the rail in any noticeable way.
Sliding the awning in for someone my height is really best done standing on a plastic beer case snagged last time we were in Belgium, I find Jupiler to be best, but for someone less vertically challenged this will not be a problem. There is plenty of a gap between C- slot and gutter edge, it’s just easier if you can see it.
So I guess the answer to my question is “I’m happy with the job”!
I can fully recommend this process if you want beautiful, leak free awning rails under roof bar feet….JUST BE CAREFUL WITH THE ANGLE GRINDER ON ALUMINIUM!!!!!!
I look forward to any comments and good luck if you do this yourself, it takes a bit of time but if you have that I think you will be very happy with the result.
So….we have had the van (2017 T32 LWB 204 DSG Kombi) for almost a year now and I have been obsessed with the idea of fitting a leak- free awning rail under the roof bars. I wanted a sunshade and rainshelter option for day trips with no obvious visible fittings with a small pack size for the awning within the van. I have been reading all the T6 Forum posts regarding leak- free roof bar and awning rail fitting and synthesised my own formula! Some FANTASTIC knowledge available here, so thanks to all who came before me. Standing on the shoulders of giants and all that (and I am only 5’5” after all LOL!).
Anyway, with things calmer at work and at home I finally got round to biting the rubber bullet! (N.I. humour) My son is now 7 months old so a little more time in the day…
I fitted the Thule Wingbars months ago using just the factory rubber washers and a dab of silicone before inserting the bolts. I chose the Thule bars rather than rails with cross bars because I often transport my 15’ open canoe and need to be sure of the load- bearing capacity. They don’t look as slick as the rails and crossbars in my opinion but needs must so bar position was a combination of what I thought looked cool and suitable position to support the boat. The bars are positioned at #2 and #5 looking from the front of the van and have been great so far with no leaks and the boat sitting perfectly with the bow just over the front windscreen a few cm off the roof and a slight overhang at the rear which is fine.
I decided to use the Thule 753 rather than 751 feet as they are lower profile which probably isn’t as practical but for me looks a bit better! NOTE: it is definitely a jiggly- squeeze to get the locking covers on with the 753 feet but it can be done with a bit of fettling. I was hoping this process would actually be easier with a few mm of awning rail and rubber washer beneath…I bought replacement 45mm stainless hex socket bolts for the roof bar feet to roof connection instead of the stock 40mm due to the added height beneath the feet.
Anyway, onto awning rail choice. Having fitted black load- rated alloys, debadged the rear, rebadged the VW logos gloss black, replaced the chrome grill strip with gloss black and fitted a travelinlite gloss black splitter I wanted to keep the black accents if possible. Gloss black trapezoid side bars may follow…ssssh! Keder rails have a fairly reasonably costing black powder coated awning rail on Amazon but they could not ship to Northern Ireland so I went for the Funky Leisure rails. I say rails because it always bothered me that one side of the bars would be slightly higher than the other so the low cost of the Funky Leisure rails enabled me to buy one for each side for the price of one basically. Aesthetically I think the Camper Essentials rail is the best looking and they essentially(!) can provide what I have done as regards roof bar feet cutouts but I reckoned the Funky Leisure rails were even more inconspicuous. They are also a third of the price and have a wider flat section to the roof than the Keder brand rails on Amazon. I bought them 2.8m long undrilled and uncut because I had plans to put bevelled awning entries and foot bar feet cut outs etc on them similar to the Camper Essential product.
As regards colour, I contacted a local powder- coater and understandably the minimum cost was £100+ vat due to setup etc so I decided to go for the DIY paint approach. The Funky Leisure rails come in the natural aluminium colour so once again, “good” paints not being shipped to Northern Ireland from Amazon, I went down to Halfords and bought their slightly more expensive acid etch primer, gloss black paint and lacquer with plans to paint after cutting and drilling.
Concerns before fitting were the 2mm gap between rail and roof under the roof bar feet due to the rubber (neoprene) washers- would the roof bar feet be secure when not neatly flush on their base and rear with the roof? Only fitting would tell but I was hopeful!
I acquired the parts as follows:
- 6x 25mm black stainless button flange hex bolts (head diameter 13mm) to replace the factory blanking bolts which are quite soft and the extra 5mm length compensates for the added depth of 2.5mm deep rail + 2x 2mm washers
- 4x 45mm stainless hex bolts to replace the 40mm length standard Thule roof bar bolts
- 20x 2mm thick x 16mm OD x 5mm ID rubber neoprene washers to replace the factory washers- I chose 5mm ID instead of 6mm because they still slide up the bolts fine but make a better seal to prevent water ingress.

On to the fitting!
The first task was to remove the roof bars and roof blanking bolts, set the awning rails on and check inboard/ outboard/ fore/ aft position, cut the front angle, drill the 5 holes and dry fit. I decided to cut the front of the rail to match the angle on the front of the gutter similar to the Camper Essentials rails purely because they look good.
Once this angle was cut using a cardboard template to match the gutter angle, I then laid the rails on the roof and decided on fore/ aft position with the rails 100mm from the tailgate at the rear because they are low in the gutter and this would enable easy sliding in of the awning at either end without being blocked by the higher tailgate top and also the end of the rail matched the end of the roof’s raised sections so looked tidy. I filed the rear corner edge of the aluminium rail for tidiness and to avoid snagging/ tearing of the awning. Over the whole process I found hand files to be more controllable and accurate than the power file.


After that I decided how far outboard of the roof gutter edge dip I wanted the awning insertion section (I decided to have the flat of the rail neatly matching the flat part of the upper gutter with the bolt holes in the middle of the 20mm wide flat awning rail section), marked up bolt positions, centre- punched then drilled with a series of bits to keep the holes neat and centred. I kept the holes 6mm to give least potential for water ingress. Then I dry- fitted the rails to make sure the holes lined up with bolt positions, they fitted perfectly and I learned that the captive nuts in the roof actually allow for a little movement so all good there!


With the rails loosely fitted, I set the roof bars on top in position and marked where the roof bar feet cut outs would be. I added 10mm either side of the cutouts to give room to slide the awning around the feet.

I then marked angled awning entry cuts for the front and end of each rail along with before and after each roof bar foot. I made the slope with a 30mm bottom edge which seemed about right. These are probably unnecessary but I thought they would look good and also prevent awning snagging.


As regards cutting the aluminium, my oscillating saw with a brand new blade didn’t seem to be great on the aluminium so I went for the grinder with a cutting disc. WARNING: after making all the cuts I was doing research and apparently it’s a really bad idea to use the grinder on aluminium (although you can get an aluminium specific disc which I did not have) as the aluminium is so soft the blade can get bogged down, throw the piece of work back in your face etc. plus it is ESSENTIAL to wear a mask and goggles as the small pieces of aluminium dust and possibly gas are extremely harmful to your lungs. USE A GRINDER ON ALUMINIUM AT YOUR OWN RISK!!!! Anyway, after my first cut bogged a bit I was super careful, used very light pressure and it turned out fine. Too lazy to hacksaw!

Cutting was quick and relatively easy if scary at times (once again I can’t recommend using a grinder to cut aluminium) but the most time- consuming process was filing and sanding the aluminium to get an acceptable finish. I used a power file for the non- delicate work and finished with hand files then sandpaper for final shaping. Randomly, a crooked knife for canoe paddle shaping turned out to be super useful for removing aluminium burrs, I found the soft aluminium almost wood- softness to work with….treat it lightly and with care!
NOTE: be careful when you remove the C- section leaving only the flat section because the aluminium has the potential to be floppy without the structure the C- section provides. It is fine when bolted but not when carrying it around!!!
When all holes and cuts had been made and sanded smooth I gave the entire rails a rub down with scotchbrite in preparation for painting.
After that I bodged some hangers for the rails from the clothesline using two levels of cut up wire coat hangers and found that they let me paint without any significant missed patches. After a rub down with electrical contact cleaner I gave the rails 3 good coats of acid etch primer. I paid close attention to the inner C- sections to make sure they had a complete coat of paint and they were straightforward enough to access with a close up but fast pass with the spray can. After that I gave the whole lot a very light rub down and cleaned off with solvent ready for the next layer.

I used 3 layers of Halfords gloss black for the next coat, sanding lightly with scotchbrite after the first but not between the next two.
Then 3 layers of clear lacquer and Bob’s your uncle! Lovely glossy finish, not paint shop perfect but no noticeable flaws unless really looking hard.

After that I dry- fitted the rails to test how securely the roof bar feet sat. I had considered using a 19mm wide 3mm thick butyl layer between the tail and roof but after the dry fit decided not to because as I read in another post on here, the gap gives room for water to drain away and not pool and the rails were totally solid with minimal flex even at the ends despite the roof bar feet cutouts, if fact the floppiness of the aluminium after the front cutout totally disappeared when the roof bar foot is securely bolted down.
For the final fit I used a dab of clear waterproof silicone (splurged on a new tub LOL) in all the 10 bolt holes for a “belt and braces” leak- prevention approach and then washers, rails, upper washers, feet, bars and bolts! Job done!


I’m really happy with the end result. The awning slides smoothly into the bevelled ends and is easy to manoeuvre round the roof bar feet. It does take a few more seconds than with an uncut rail but isn’t much of a hassle.
I know the rails are totally invisible anyway apart from to those in HGVs but it makes me happy knowing that not only can we throw up a sun or rain shade in minutes but that the rails are black and shiny up there in their wee grooves!!! After fitting I admit I thought for a second “why did I even bother painting them?” but in hindsight painting also conceals any unwanted imperfect sanding marks!
The big question….. if I was doing it all over again what would I change….?
Well, if I had unlimited cash or no tools or skills or “the fear”, I would get camper essentials to make their rail custom cut for my roof bars because their rail shape is so beautiful but that would cost SIGNIFICANTLY more…. About 3 times the price whether I went for one side or both.
Ideally I’d have them powder coated instead of painted but once again this would add at least £100 on the cost unless I was already having e.g. wheels powder coated at the time.
I might consider using a few strips of bicycle inner tube cut to size under the rail beneath the roof bar feet if I did it again as when you bolt the foot down it takes the rail almost to the roof as expected but this doesn’t seem to have distorted the rail in any noticeable way.
Sliding the awning in for someone my height is really best done standing on a plastic beer case snagged last time we were in Belgium, I find Jupiler to be best, but for someone less vertically challenged this will not be a problem. There is plenty of a gap between C- slot and gutter edge, it’s just easier if you can see it.
So I guess the answer to my question is “I’m happy with the job”!
I can fully recommend this process if you want beautiful, leak free awning rails under roof bar feet….JUST BE CAREFUL WITH THE ANGLE GRINDER ON ALUMINIUM!!!!!!
I look forward to any comments and good luck if you do this yourself, it takes a bit of time but if you have that I think you will be very happy with the result.

