Yes it's not going back on the road til they arrive, I'm not risking reusing the old bolts, I've seen where that goes...It's worth replacing them if you can, the stretch bolts can end up a weird shape even if only used once!
Check out the shape of front damper pinch bolts:
View attachment 42575
You are using an out of date browser. It may not display this or other websites correctly.
You should upgrade or use an alternative browser.
You should upgrade or use an alternative browser.
[Guide] Adjusting B14 Ride Height With H&R ARBs
- Thread starter andys
- Start date
It's worth replacing them if you can, the stretch bolts can end up a weird shape even if only used once!
Check out the shape of front damper pinch bolts:
View attachment 42575
I've never seen anything quite like that top one in the photo!
I've never seen anything quite like that top one in the photo!
Yeah it's quite something, glad I had new to replace them!
All 4 had a some form of a bend to them but the top one in that photo could rival bananas for their shape!
Last edited:
Good effort!!I am happy to report the little fecker is out!
New drill bits arrived today so third night in a row straight out to the garage after work without eating, not something I do lightly. They were definitely better, this time I could just see tiny particles of metallic dust falling out, but 20 mins later the hole was still only 4mm. It took another half an hour of constant drilling, with changes of hand and battery when it got tired to get through, though it did look as if it was in a bit of an angle. Miraculously though, I got a screw extractor halfway in when it went loose, and pulling it out, the bolt came out in two pieces. Cleaned up the thread with a tap and all sorted. Thank f*ck for that!
The new bolts haven't arrived so the ARB is not going back on yet, but all the threads have been cleaned up ready and I'm going to take the opportunity to drop the springs another 5mm at the back just to get it absolutely level.
Brilliant, and with the torque settings I needed tooI had a ratch through the VW data the other day and found the definitive answer on the rear ARB Bush orientation:
View attachment 42649
It is as most commonly seen, the raised edges sit downwards, into the clamp.
 The resolution isn't clear enough to make out which way up the bushing is though, is it as you thought?
Edit: Forget that, I've just seen the bottom line in your post. I checked mine tonight and they've both been fitted the other way up. THQ at their finest again.
Brilliant, and with the torque settings I needed tooThe resolution isn't clear enough to make out which way up the bushing is though, is it as you thought?
Edit: Forget that, I've just seen the bottom line in your post. I checked mine tonight and they've both been fitted the other way up. THQ at their finest again.
You're right, the resolution of that screen shot isn't the best for zooming in. Here's another effort!


Time to wind this up 
ARB clamp and lower shock bolts arrived today and are all now on the van and torqued down to the correct settings. Oddly, the extra 5mm I lowered the back adjusters when I took them off the second time hasn't translated into a further drop in ride height, I'm assuming the weight in the back isn't enough to compress them any further. It's also resulted in a slight raising of the front by 3mm as it levelled up, but after a quick round-the-block to settle the springs in the seats it's now sitting at exactly 383mm wheel centre to arch, both back and front (from 400mm rear, 380mm front before I started) so I haven't needed to touch the fronts at all. To get this 17mm drop in rear ride height has meant going from 33mm of thread showing on the rear adjusters to 14mm showing, which doesn't tie up with what I thought it would do from the position on the lever, but it looks like it depends on the weight distribution of the van, and because of the layout of mine the weight is concentrated midships rather than at the rear. It still looks a little nose down to me but that may just be the styling of it, or it could be my imagination seeing something that isn't there
So that's done, and replacement for the cracked rear light fitted, courtesy of @Pablo, the uprated solar controller fitted and the electrical remote waste tank dumping system finished, plus I've got the repaired canvas back and have a day off tomorrow when it's allegedly not going to rain, so that will hopefully be back on then. I smell the sweet scent of progress all of a sudden
So looking back on this job. It's the first time I've ever attempted anything like this, and to be honest it's probably cost me more in parts and breakages than getting someone else to do it, and there's been a lot of frustrating messing about due to my inexperience. HOWEVER, I'm really glad I did it, as I can now do these adjustments so easily and quickly now I've learned how, so will never have to pay anyone to do this sort of thing again. I wouldn't think anything of whipping it all off and adjusting them now so yet again, learning by my own mistakes has been a great teacher. Anyone in the North Lincs/South Yorks considering doing this themselves but put off, give us a shout, as some others on here have said, it really is a doddle once you know how.
Thanks again to everyone who gave advice and encouragement from the sidelines, much appreciated

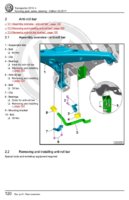
I had a ratch through the VW data the other day and found the definitive answer on the rear ARB Bush orientation:
View attachment 42649
It is as most commonly seen, the raised edges sit downwards, into the clamp.
Chaps - Did you replace both the chassis and suspension arm U bracket bolts; parts 2 & 6 in the diagram ?
Does anyone have the part number for the clamp bolts that are t be replaced ?....I don't want to join Andys' club.....
Chaps - Did you replace both the chassis and suspension arm U bracket bolts; parts 2 & 6 in the diagram ?
Does anyone have the part number for the clamp bolts that are t be replaced ?....I don't want to join Andys' club.....
The H&R rear arb comes with a new clamp and bolts (parts 2 and 3 in the above diagram) for the two chassis mounts, so that takes care of those.
I did replace the rear arm arb clamp bolts (part 6 in the above diagram - 4 × M8 bolts), i will find the VW part number for those bolts and post up shortly.
EDIT:
Part number for rear arm arb clamp bolt (part 6 in above diagrams):
N0195268
Last edited:
The H&R rear arb comes with a new clamp and bolts (parts 2 and 3 in the above diagram) for the two chassis mounts, so that takes care of those.
I did replace the rear arm arb clamp bolts (part 6 in the above diagram - 4 × M8 bolts), i will find the VW part number for those bolts and post up shortly.
EDIT:
Part number for rear arm arb clamp bolt (part 6 in above diagrams):
N0195268
Thanks for the P/N chap.
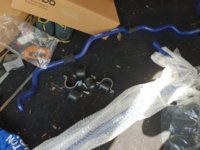
Oh yeah.... It's like I didn't open the box before posting..... Oh, hang on..
Thanks for the P/N chap.
Oh yeah.... It's like I didn't open the box before posting..... Oh, hang on..
View attachment 45005
No worries buddy.

Yeah you've got the rear arb chassis clamps, bushes and bolts there.....iirc they're an 8mm hex head.
Looks like the easiest in the world to change too...
Yeah it is! Get the rear off the deck so the rear arms are at the lowest and it's a breeze.

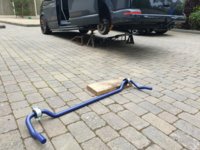
I feel good when people learn from my mistakesIt took longer to get the thing up in the air than to fit the ARB;
View attachment 45343
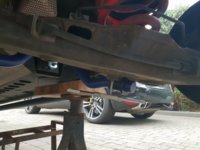
Chased out the threads in the wishbones so as not to befall the same fate as @andys . One hole was very tight, and I could feel the tap springing, so had to resort to CT90 lubricant as well...
View attachment 45344
I suffered the same fate today when I was re-using the old bolt after fitting levelling sensors.So everything back together, wheels torqued up and pulled the van back onto the drive for the final easy task of bolting the ARB clamps back on. Piece of cake, couldn't have gone better, feeling very pleased with myself, in fact decidedly smug...
Bolt 1 and 2 done, now on to bolt no 3. Then this...
View attachment 42379
Fu&*^%^&)*^%$%^&****^^%%^&((&^%%$%
I didn’t get a photo of it in situ, but was lucky enough to have enough thread exposed that I could get a pair of long-nose pliers on and twist it out.
As luck would have it, I had some N0195268 M8x22 bolts left over from my Cali bed install:
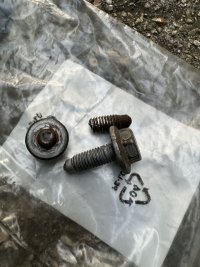
Whilst some easy jobs seem to take a lot longer than you plan for, bizarrely this set back was remedied fairly quickly!
Similar threads
- Replies
- 6
- Views
- 1K
- Replies
- 3
- Views
- 914
- Replies
- 43
- Views
- 3K

